
Table of Contents
- Introduction
- The Core Problem Teleport Solves
- Teleport vs VPN vs Bastion Hosts
- Fundamental Architecture Concepts
- Teleport Architecture Deep Dive
- Advanced Features
- How It All Works Together: Complete Flow Examples
- Getting Started with Teleport
- Performance and Scaling Considerations
- Best Practices
- Failure Modes and Operational Realities
- Trade-offs, Limitations, and Alternatives
- Opinionated Architecture Guidance
- Troubleshooting Common Issues
- Conclusion
- Additional Resources
Introduction
The average production environment has hundreds of servers, dozens of databases, multiple Kubernetes clusters, and engineers connecting from laptops, CI pipelines, and cloud VMs across every network imaginable. The traditional answer — VPNs, bastion hosts, SSH keys that accumulate for years — was never designed for this. It was designed for a world where your infrastructure lived in one data center and your engineers sat in one office.
Teleport is a complete rethinking of infrastructure access for the distributed, ephemeral, multi-cloud reality most teams actually operate in. It replaces static credentials with short-lived certificates, VPN perimeters with identity-aware reverse tunnels, and fragmented audit trails with unified session recording across every protocol.
This document is a technical deep dive into how Teleport works — its architecture, security model, failure behavior, and the operational decisions you’ll need to make to run it well in production. It’s written for engineers evaluating Teleport, implementing it, or trying to operate it at scale.
Mental Model: Teleport = Identity-aware access proxy + certificate authority + audit system. Users authenticate via SSO, receive short-lived certificates scoped to their roles, and connect to resources through a proxy that routes traffic via reverse tunnels from agents. No standing credentials. Every session recorded. Access determined by identity, not network location.
The Core Problem Teleport Solves
Before diving into how Teleport works, let’s understand the problems it addresses:
Traditional Infrastructure Access Challenges:
- Static Credentials: SSH keys, database passwords, and API tokens that live forever and proliferate across systems
- Trust on First Use (TOFU): The first SSH connection requires blindly trusting a host fingerprint
- Access Sprawl: Different tools and methods for accessing servers, databases, Kubernetes, applications
- Poor Auditability: Limited visibility into who accessed what, when, and what they did
- Credential Management: Manual rotation, distribution, and revocation of access credentials
- Network Complexity: VPNs, bastion hosts, and jump boxes that add latency and attack surface
Teleport addresses these challenges through a certificate-based authentication model, unified access proxy, and comprehensive audit logging.
Teleport vs VPN vs Bastion Hosts
Organizations have traditionally relied on VPNs and bastion hosts to provide infrastructure access. Teleport replaces these older models with a zero-trust, identity-native access plane.
Here’s how they compare:
VPN Model
VPNs extend the corporate network perimeter outward, effectively placing engineers “inside” the private network.
How it works:
- User connects to VPN
- Gains broad network-level access
- Then uses SSH, kubectl, database clients directly
Limitations:
- Network-level trust instead of identity-level trust
- Difficult to enforce least privilege
- Poor visibility into what happens after connection
- VPN credentials are often long-lived
- Expands attack surface by exposing entire subnets
Bastion Host Model
Bastion hosts (jump boxes) centralize SSH entry through a hardened server.
How it works:
- User SSHs into bastion
- Then hops into internal servers/databases
Limitations:
- Still relies on SSH keys or static credentials
- Bastion becomes a high-value attack target
- Limited protocol support beyond SSH
- Session recording and auditing require extra tooling
- Scaling bastions across regions is operationally complex
Teleport Model (Zero Trust Access Plane)
Teleport replaces perimeter-based access with certificate-based, identity-aware access.
How it works:
- Users authenticate via SSO + MFA
- Teleport issues short-lived certificates
- Proxy routes access to specific approved resources
- Every session is recorded and audited
Key Advantages:
- No VPN required for infrastructure access — Teleport eliminates the VPN for SSH, databases, Kubernetes, and applications; organizations may still use VPNs for legacy systems, unsupported protocols, or east-west traffic patterns
- No inbound firewall rules (reverse tunnels)
- Identity-based access, not network-based trust
- Works across SSH, Kubernetes, databases, apps, desktops
- Built-in audit logs, session playback, access requests
- Credentials expire automatically (zero standing privileges)
Quick Comparison Table
| Feature | VPN | Bastion Host | Teleport |
|---|---|---|---|
| Trust Model | Network perimeter | Jump-box perimeter | Zero Trust identity-based |
| Credentials | Long-lived | SSH keys | Short-lived certificates |
| Access Scope | Broad subnet access | Host-level | Resource + role scoped |
| Auditability | Weak | Limited | Full session + event audit |
| Protocol Support | Any network traffic | Mostly SSH | SSH, DB, K8s, Apps, RDP |
| Firewall Exposure | Requires network access | Bastion exposed inbound | Only Proxy exposed inbound |
| Privilege Escalation | Manual | Manual | Built-in Access Requests |
Teleport modernizes infrastructure access by eliminating static credentials, reducing attack surface, and making access fully observable and time-bounded.
Teleport doesn’t just replace SSH — it replaces the idea that networks should be trusted.
Fundamental Architecture Concepts
Non-Obvious Insight: Teleport Shifts the Trust Boundary
Most infrastructure security improvements add controls on top of an existing trust model. Teleport does something more fundamental — it shifts where trust lives.
| Model | What Is Trusted |
|---|---|
| VPN | The network — if you’re “inside”, you’re trusted |
| Bastion host | The jump box — SSH to it, then you’re trusted |
| Teleport | Identity + device + time — the network is never trusted |
Traditional systems ask: “Is this request coming from the right network?”
Teleport asks: “Is this a valid identity, with the right role, on an approved device, within a valid time window?”
This shift has a non-obvious consequence: Teleport makes your infrastructure location-independent by design. A contractor on a coffee shop WiFi, a CI pipeline in a cloud VM, and an on-call engineer on a home network all authenticate through the same identity-first path — with no VPN, no static keys, and no network-level exceptions to manage. The network becomes a commodity transport layer, not a security boundary.
This is what “zero trust” actually means in practice — not a product category, but a fundamental reorientation of where the perimeter lives.
The Cluster: Foundation of Teleport’s Security Model
The cluster is the foundational concept in Teleport’s architecture. A Teleport cluster is a logically grouped collection of services and resources that share a common certificate authority and security boundary.

Key Principle: Users and resources must join the same cluster before access can be granted. Teleport replaces SSH trust-on-first-use with CA-based node identity established during secure cluster join.
Certificate-Based Authentication: The Heart of Teleport
Teleport operates as a certificate authority (CA) that issues short-lived certificates to both users and infrastructure resources. This is fundamentally different from traditional password or SSH key-based authentication.
Why Certificates?
- Cryptographically Secure: Much harder to forge than passwords or simple keys
- Self-Contained: Include identity, permissions, and expiration in one signed document
- Decentralized Signature Validation: Each service validates the certificate independently using the CA’s public key — no Auth Service round-trip per request. However, authorization is still based on roles and policies centrally issued by the Auth Service, and revocation requires CA rotation, user lockout, or session termination rather than a simple flag flip.
- Automatic Expiration: Expiration reduces reliance on revocation, though Teleport supports revocation mechanisms when needed
- Scalable: Suitable for large deployments with many services
Short-Lived Certificates and Zero Standing Privileges
Teleport issues certificates with very short time-to-live (TTL) periods, typically a few hours (configurable via max_session_ttl). Access Requests may issue certificates for minutes or hours, and bot tokens often use much shorter TTLs. This creates a “zero standing privileges” model where access automatically expires.
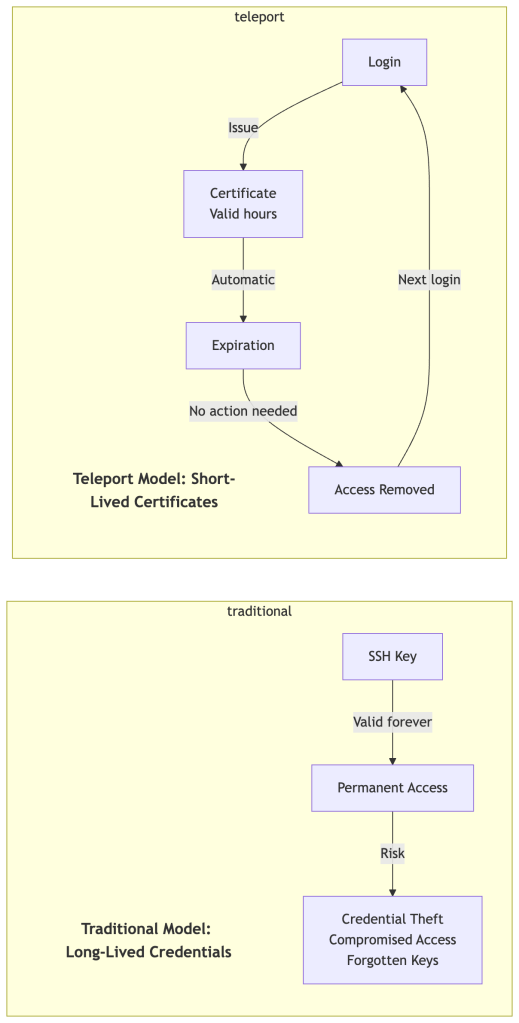
Benefits of Short-Lived Certificates:
The security properties described above compound into practical operational wins: a stolen certificate expires on its own, offboarding requires no key revocation sweep, there’s no accumulation of forgotten credentials across systems, and every access event is time-bounded by design — making compliance audits straightforward. The explicit revocation mechanisms (CA rotation, user lockout, session termination) exist for immediate invalidation when you can’t wait for TTL expiry.
Secure Node Enrollment (Join Tokens)
A critical aspect of Teleport’s security model is how agents and nodes securely join the cluster. This process establishes the initial trust relationship that underpins all subsequent certificate-based authentication.
Join Process:
- Token Generation: Admin creates a join token via the Auth Service
- Token Types:
- Static tokens (for testing/development)
- Dynamic tokens (one-time use, expire after period)
- Provisioning tokens (AWS IAM, Azure AD, GCP identity)
- Secure Bootstrap: Node uses token to prove its identity to Auth Service
- CA Pinning: Node receives and pins the cluster CA public key
- Certificate Issuance: Auth Service issues node certificate after successful validation
- Continuous Identity: Node uses certificate for all subsequent cluster interactions
Security Considerations:
- Join tokens should be treated as highly sensitive credentials
- Use dynamic, short-lived tokens in production
- Leverage cloud provider identity (IAM roles) for automated, secure joins
- Monitor join events in audit logs
- Rotate join tokens regularly
This secure enrollment process ensures that even before certificate-based authentication begins, nodes have established verifiable trust with the cluster, eliminating the trust-on-first-use problem entirely.
Teleport Architecture Deep Dive
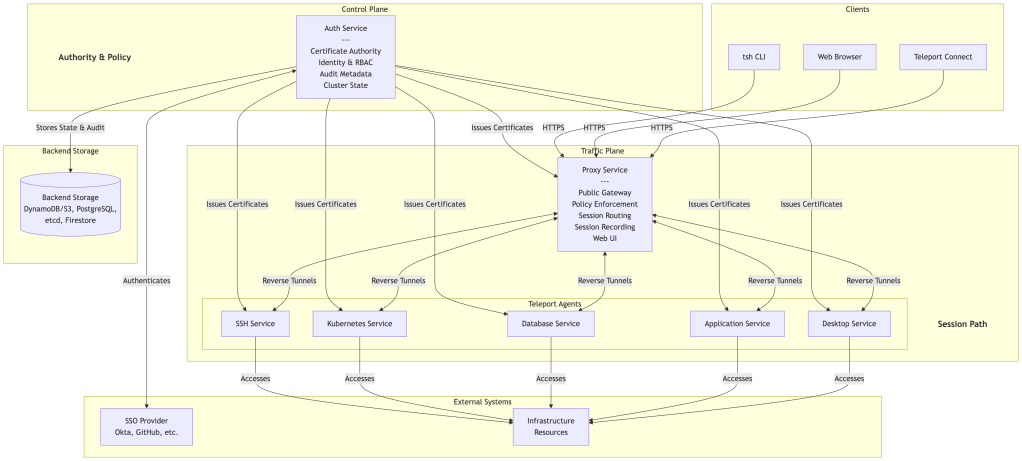
Control Plane vs Traffic Plane Separation
Teleport separates authority and policy decisions from session traffic handling:
Control Plane (Authority & State):
- Auth Service: Certificate issuance, identity management, RBAC, policy evaluation
- Backend storage: Cluster state, audit logs, session metadata
- Management operations: User, role, and policy configuration
Traffic Plane (Session Path):
- Proxy Service: Public gateway, client termination, policy enforcement, session routing and recording
- Teleport Agents: Protocol-specific access to infrastructure resources
- Session data: Live SSH, Kubernetes, database, application, and desktop traffic
The Auth Service never handles interactive traffic directly. All live sessions flow through the Proxy and Agents, using short-lived certificates issued by the Auth Service.
Core Components
Teleport’s architecture consists of three main components that work together to provide secure infrastructure access:
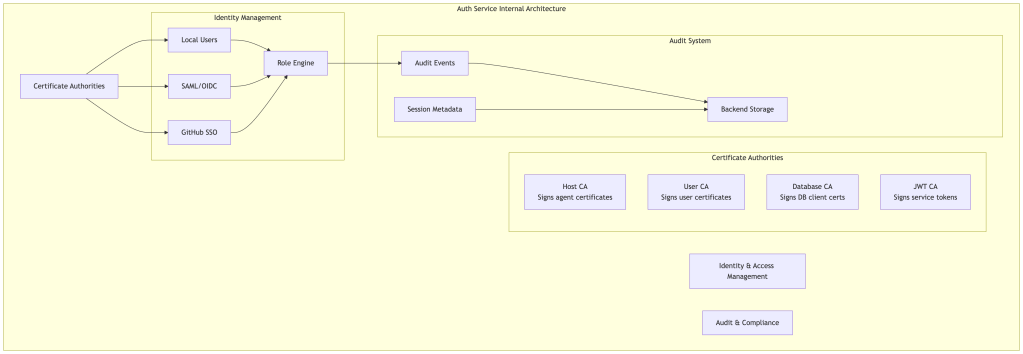
1. Auth Service: The Certificate Authority
The Auth Service is the brain of a Teleport cluster. It performs three critical functions:
Certificate Authority Management:
- Maintains multiple internal certificate authorities for different purposes (host CA, user CA, database CA, etc.)
- Signs certificates for users and services joining the cluster
- Performs certificate rotation to invalidate old certificates
Identity and Access Management:
- Integrates with SSO providers (Okta, GitHub, Google Workspace, Active Directory)
- Manages local users and roles
- Enforces Role-Based Access Control (RBAC)
- Issues temporary access through Access Requests
Audit and Compliance:
- Collects audit events from all cluster components
- Coordinates session recording storage
- Maintains comprehensive audit logs of all access and actions
Backend Storage Options:
The Auth Service uses pluggable backend storage for cluster state and audit data:
- DynamoDB + S3: AWS-native option (state in DynamoDB, recordings/logs in S3)
- PostgreSQL: Self-hosted relational database option
- etcd: High-availability key-value store
- Firestore: Used by Teleport Cloud
Choose based on your infrastructure, performance requirements, and operational preferences.
In practice: DynamoDB + S3 is the most operationally scalable choice on AWS — it offloads capacity management and delivers predictable performance at scale. PostgreSQL is preferred for portability and on-prem deployments, but requires careful tuning (connection pooling, vacuuming, index maintenance) at scale. etcd is generally only appropriate if you’re already operating it for Kubernetes and want a unified store for small deployments. Firestore is used by Teleport Cloud.
2. Proxy Service: The Access Gateway
The Proxy Service is the public-facing component that users and clients interact with. It serves as the gateway into the Teleport cluster.
Key Responsibilities:
Public Access Point:
- Provides HTTPS endpoint for web UI and API
- Terminates TLS connections
- Serves as single point of entry for all access
Connection Routing:
- Maintains reverse tunnel connections from all agents
- Routes user connections to appropriate backend resources
- Load balances across multiple agent instances
Session Management:
- Proxies SSH, Kubernetes, database, and application protocols
- Coordinates session recording
- Manages concurrent session limits
Web Interface:
- Hosts web-based terminal and management UI
- Provides resource discovery and selection
- Displays audit logs and session recordings
Why Reverse Tunnels?
Traditional architectures require opening inbound firewall rules to resources. Teleport’s reverse tunnel approach means:
- No Inbound Firewall Rules: Agents connect outbound to Proxy
- NAT Traversal: Works behind NAT and restrictive firewalls
- Private Network Access: Reach resources in private subnets without VPN
- Simplified Security: Only Proxy needs public IP and open ports
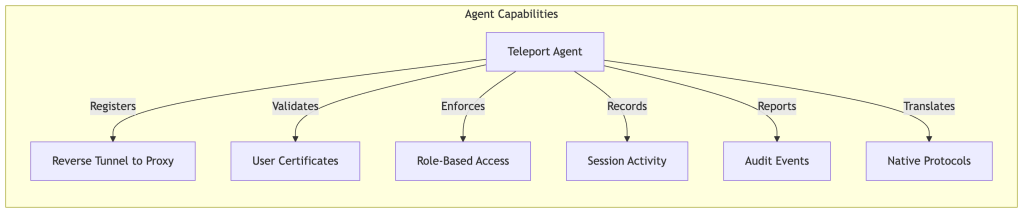
3. Teleport Agents: Protocol-Specific Services
Agents run alongside infrastructure resources and handle protocol-specific access. Each agent type specializes in a particular protocol or resource type.
Agent Types:
SSH Service:
- Provides SSH access to Linux/Unix servers
- Provides an SSH proxy service that supports OpenSSH clients and Teleport-issued certificates
- Supports standard SSH features (port forwarding, SCP, SFTP)
- Records session activity
Kubernetes Service:
- Provides access to Kubernetes clusters
- Proxies kubectl commands and API requests
- Enforces Kubernetes RBAC alongside Teleport RBAC
- Audits all Kubernetes API calls
Database Service:
- Provides access to databases (PostgreSQL, MySQL, MongoDB, etc.)
- Issues short-lived database credentials
- Audits database access sessions and connection metadata. Query-level visibility is engine-dependent — some engines support query capture natively, others require additional configuration or native database auditing alongside Teleport.
- Supports secure proxying and connection multiplexing
Application Service:
- Provides access to internal web applications
- Handles HTTP/HTTPS proxying
- Supports header-based authentication
- Enables access to web apps without VPN
Desktop Service:
- Provides RDP access to Windows machines
- Records desktop sessions
- Supports clipboard and file transfer
Multi-Service Agents:
A single agent process can run multiple services simultaneously:
# Agent running SSH, DB, and App servicesteleport: auth_token: "xyz789" proxy_server: "proxy.example.com:443"ssh_service: enabled: truedb_service: enabled: true databases: - name: "prod-postgres" protocol: "postgres" uri: "postgres.internal:5432"app_service: enabled: true apps: - name: "internal-dashboard" uri: "http://localhost:8080"
Unified Resource Inventory and Discovery
Teleport maintains a dynamic inventory of all infrastructure resources across the cluster. This provides a centralized catalog of what exists and what users can access.
Resource Catalog Features:
- Automatic Discovery: Agents can auto-discover resources (EC2 instances, RDS databases, EKS clusters)
- Dynamic Labeling: Resources tagged with metadata for RBAC matching
- Real-time Status: Live view of resource availability and health
- Search and Filter: Find resources by labels, names, or types
- Access Visibility: Shows which resources user can access based on roles
Auto-Discovery Example:
# Database service with auto-discoverydb_service: enabled: true aws: - types: ["rds", "aurora"] regions: ["us-west-2", "us-east-1"] tags: "env": "production" "teleport": "enabled"
This turns Teleport into not just an access platform but also an infrastructure visibility tool, automatically maintaining an up-to-date inventory without manual configuration.
Advanced Features
Role-Based Access Control (RBAC)
RBAC in Teleport determines what resources users can access and what actions they can perform. Roles are the central policy mechanism.
Role Structure:
kind: rolemetadata: name: backend-developerspec: options: # Certificate TTL - configurable based on security requirements max_session_ttl: 8h allow: # Which resources can be accessed logins: ['ubuntu', 'ec2-user'] # Label-based access control node_labels: 'env': ['dev', 'staging'] 'team': 'backend' # Database access db_labels: 'env': ['dev', 'staging'] db_names: ['analytics', 'app_db'] db_users: ['readonly', 'app_user'] # Kubernetes access kubernetes_groups: ['developers'] kubernetes_labels: 'env': ['dev']
Label-Based Access:
Resources are labeled, and roles specify which labels they can access. This creates dynamic access policies that automatically apply to new resources:
# Server labelsssh_service: labels: env: production team: backend region: us-west-2# Role can access any server matching these labelsallow: node_labels: 'env': 'production' 'team': 'backend'
Multi-Role Assignment:
Users can have multiple roles, with permissions being additive:
# User has both developer and on-call rolesusers: alice: roles: ['developer', 'on-call-responder']# Combined permissions from both roles apply
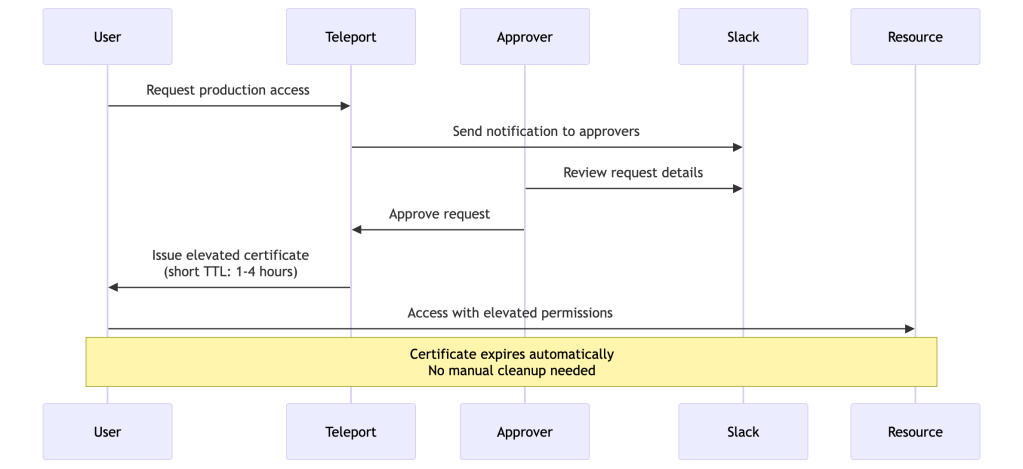
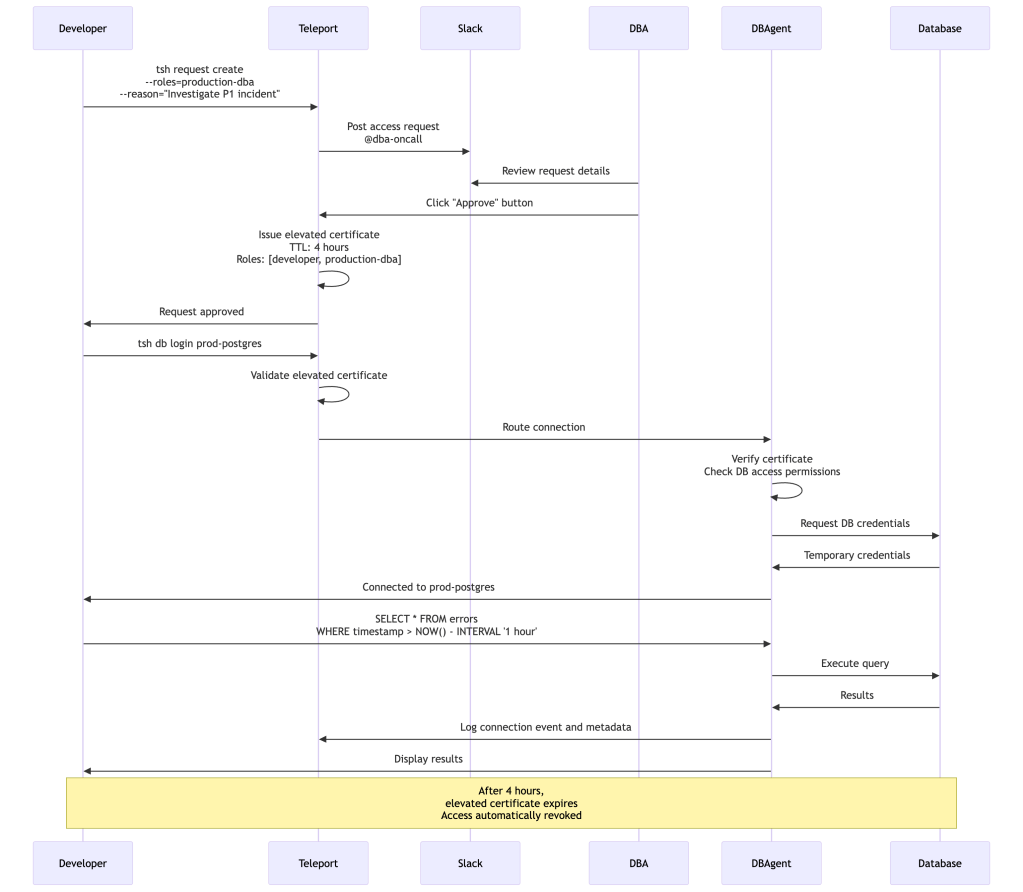
Access Requests: Just-In-Time Privilege Escalation
Access Requests enable users to temporarily request elevated privileges. This implements the principle of least privilege by default with the ability to escalate when needed.
Access Request Workflow:
Approval Workflows:
# Role that can request production accesskind: rolemetadata: name: developerspec: allow: request: roles: ['production-dba'] thresholds: - approve: 2 # Requires 2 approvals deny: 1 annotations: wtf: "Reason for access"
Integration with External Systems:
- Slack: Approvals via Slack buttons
- PagerDuty: Auto-approve during on-call
- Jira/ServiceNow: Link to change tickets
- Custom Webhooks: Integrate with any system
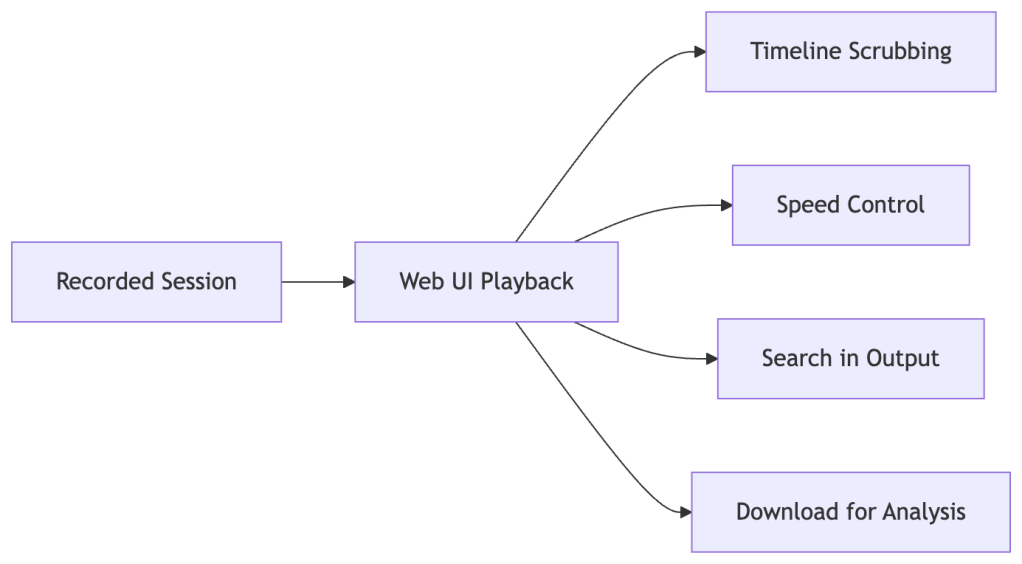
Session Recording and Playback
Teleport records all interactive sessions, creating a complete audit trail of infrastructure access.
What Gets Recorded:
- SSH Sessions: Complete terminal input/output
- Kubernetes Sessions: kubectl commands and API requests
- Database Sessions: Connection events and metadata (engine-specific query visibility)
- Desktop Sessions: Full RDP session video
- Application Access: HTTP requests and responses
Session Recording Modes:
# Node-level recording (recorded by agent)record_session: desktop: true default: node# Proxy-level recording (recorded by proxy)record_session: desktop: true default: proxy# No recordingrecord_session: desktop: false default: off
Recording mode trade-offs:
| Mode | Scalability | Control | Notes |
|---|---|---|---|
node | Better — load distributed across agents | Lower — agent must be healthy | Preferred for large fleets |
proxy | Heavier — Proxy bears recording CPU/bandwidth | Stronger — recording always captured centrally | Preferred when agent tampering is a concern |
off | Best | None | Development environments only |
Playback Interface:
Compliance Benefits:
- PCI DSS: Administrator actions on cardholder systems
- HIPAA: Access to systems with PHI
- SOC 2: Evidence of access controls and monitoring
- FedRAMP: Government compliance requirements
Session Moderation and Shared Access
Teleport enables real-time session collaboration and oversight—critical for training, troubleshooting, and compliance.
Session Joining:
Multiple users can join an active session:
# Start a sessiontsh ssh node1# Another user joins the session (read-only or interactive)tsh join alice@node1
Moderated Sessions:
Require approval before sensitive sessions begin:
kind: rolemetadata: name: production-adminspec: allow: require_session_join: - name: auditor kinds: ['k8s', 'ssh'] modes: ['moderator'] on_leave: terminate
Session Controls:
- Terminate: Kill an active session remotely
- Monitor: Watch sessions in real-time without participating
- Force Termination: Automatically end sessions when moderator leaves
Use Cases:
- Training: Senior engineers guide juniors through production tasks
- Compliance: Security team oversight of privileged access
- Incident Response: Multiple responders collaborate on live issue
- Vendor Access: Monitor third-party contractor activities
Device Trust and Hardware Security
Teleport supports enhanced security through device posture checking and hardware security keys.
Device Trust:
Verify the security posture of devices before granting access:
kind: rolemetadata: name: production-accessspec: options: device_trust_mode: required allow: # Only devices registered and verified can access node_labels: 'env': 'production'
Device Registration:
- Devices must be enrolled in Teleport
- Device identity verified via TPM or Secure Enclave
- Can integrate with device identity and posture signals depending on platform
- Certificate issued to device, not just user
Hardware Security Keys (FIDO2/WebAuthn):
# Require hardware security key for authenticationauthentication: type: local second_factor: webauthn webauthn: rp_id: teleport.example.com
Benefits:
- Phishing Resistance: FIDO2 keys can’t be phished
- Device Binding: Access tied to specific physical device
- Zero Trust: Device posture continuously verified
- Reduced Risk: Even if password leaked, hardware key required
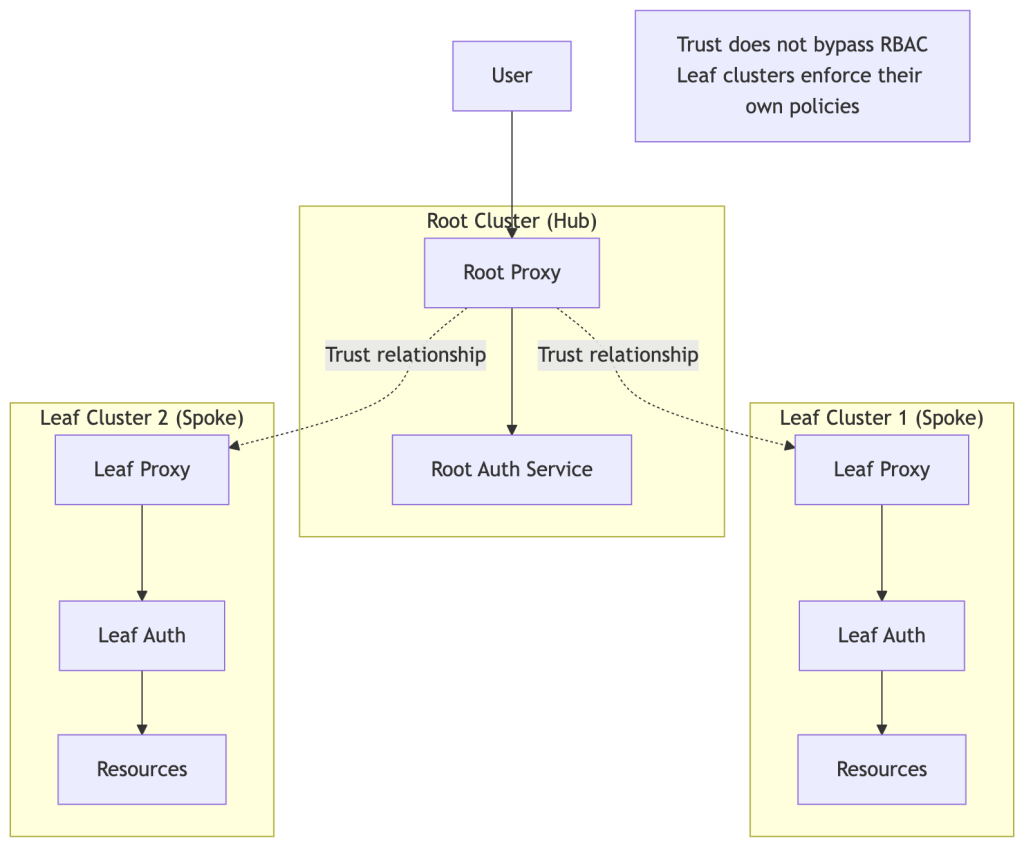
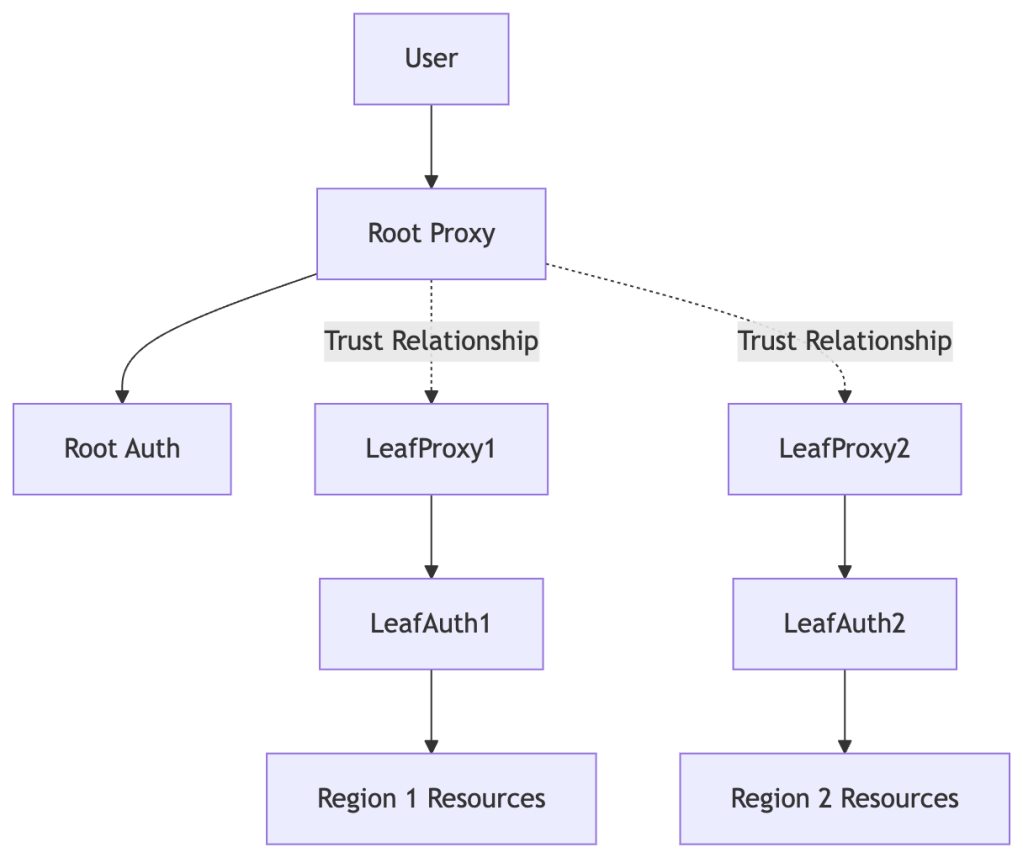
Trusted Clusters: Multi-Org Federation
Trusted Clusters enable organizations to federate multiple Teleport clusters while maintaining independent security boundaries.
Architecture:
Use Cases:
- Multi-Region: Separate clusters per region with central access
- Business Units: Independent teams with shared identity
- Customer Environments: MSPs managing multiple customer clusters
- Acquisitions: Integrate acquired companies while maintaining isolation
Trust Configuration:
# On leaf cluster - establish trust with rootkind: trusted_clustermetadata: name: root-clusterspec: enabled: true role_map: - remote: "developer" local: ["leaf-developer"] proxy_address: root.teleport.example.com:443 token: "trusted-cluster-join-token"
Security Considerations:
- Trust is explicit and bidirectional
- Role mapping controls what root users can do in leaf
- Leaf cluster RBAC still enforced independently
- Audit logs maintained in each cluster
- Trust can be revoked at any time
Teleport Connect: Desktop Experience
Teleport Connect is a desktop application that provides a graphical interface for infrastructure access, making Teleport more accessible to users who prefer GUIs over command-line tools.
Key Features:
- Visual Resource Browser: Point-and-click access to servers, databases, and Kubernetes clusters
- Saved Connections: Frequently accessed resources bookmarked for quick access
- Integrated Terminal: Built-in terminal for SSH sessions
- Database Clients: GUI for database queries and management
- Cross-Platform: Available for macOS, Windows, and Linux
Benefits:
- Lower Barrier to Entry: Easier for users new to Teleport
- Productivity: Quick access to common resources
- Consistency: Same security model as tsh CLI
- Integration: Works alongside existing Teleport deployment
Teleport Connect makes infrastructure access more intuitive while maintaining all the security benefits of certificate-based authentication and comprehensive auditing.
How It All Works Together: Complete Flow Examples
Example 1: SSH Access to Production Server
Let’s walk through a complete access flow from login to executing commands:
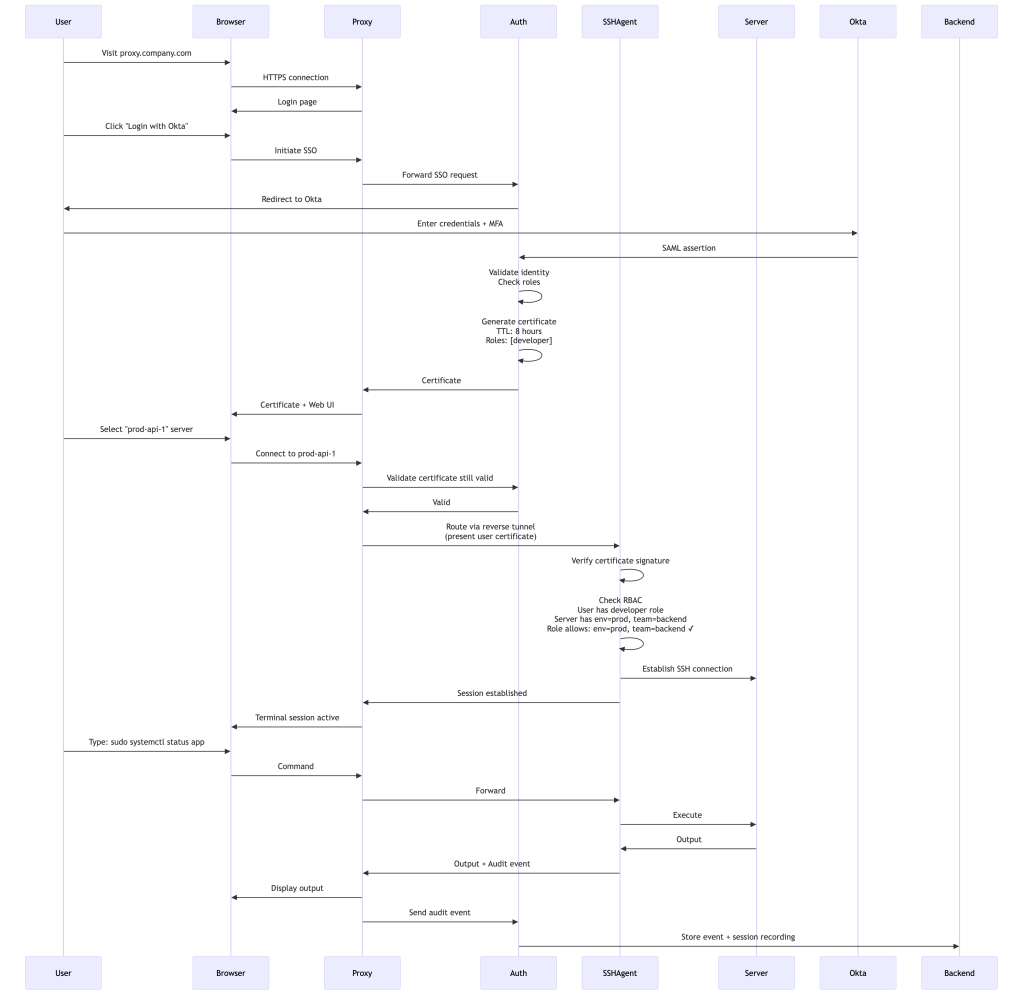
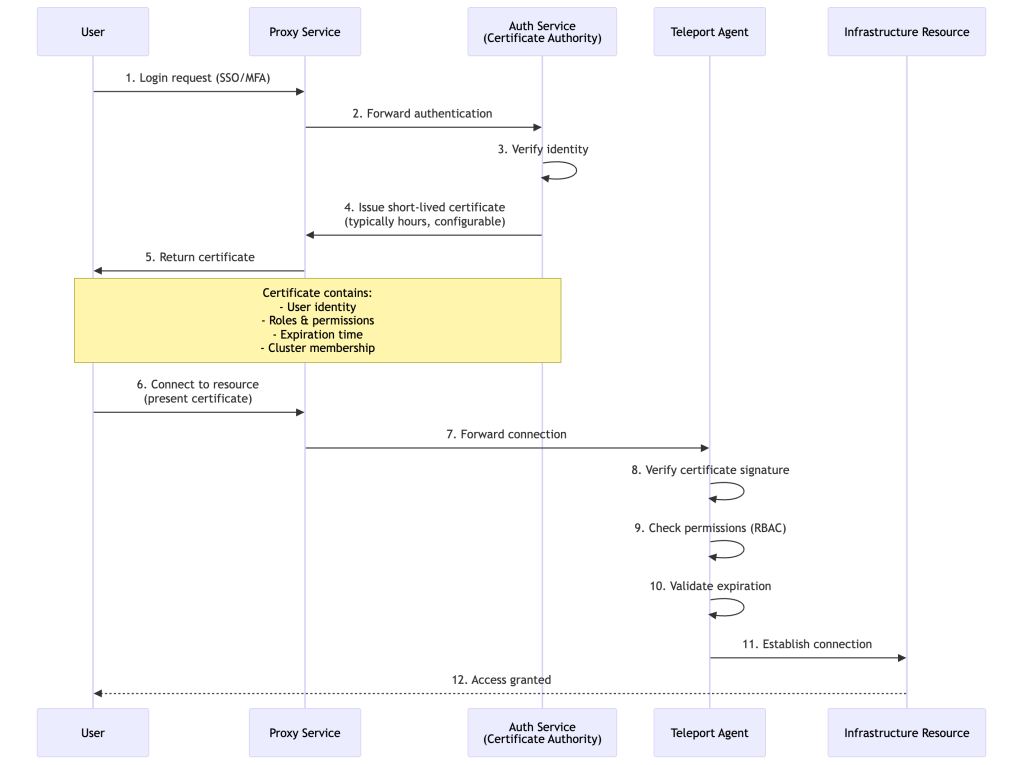
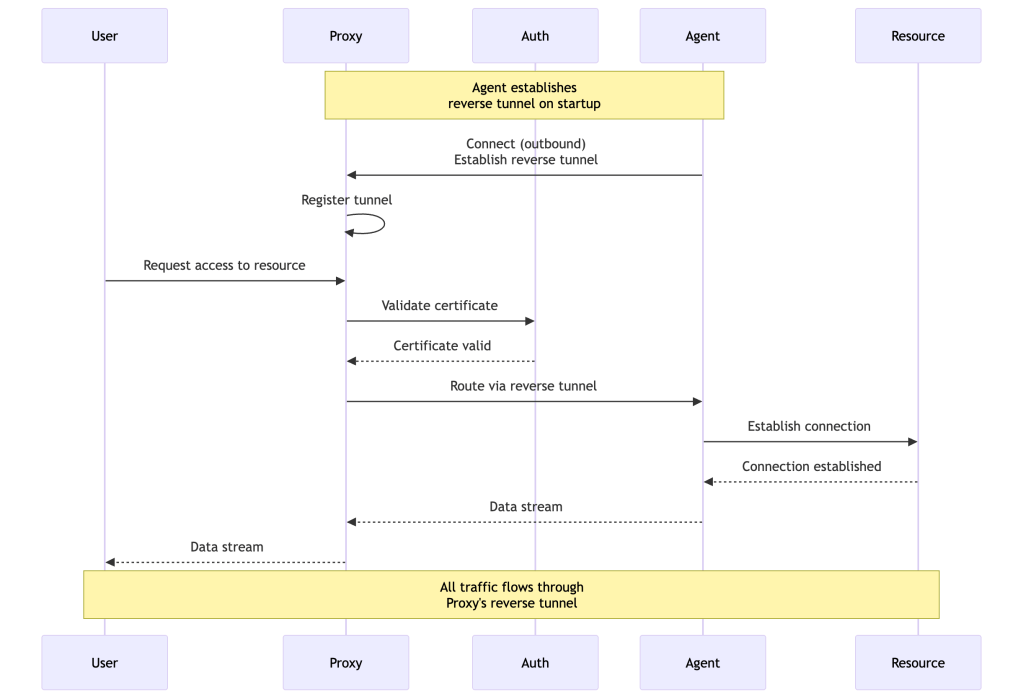
What Happens:
- User authenticates through their SSO provider
- Auth Service issues short-lived certificate with user’s roles
- User selects server from web UI
- Proxy routes connection through reverse tunnel to SSH Agent
- SSH Agent validates certificate and checks RBAC
- Commands execute, session recorded, audit events logged
- After 8 hours, certificate expires automatically
Example 2: Database Access Request Workflow
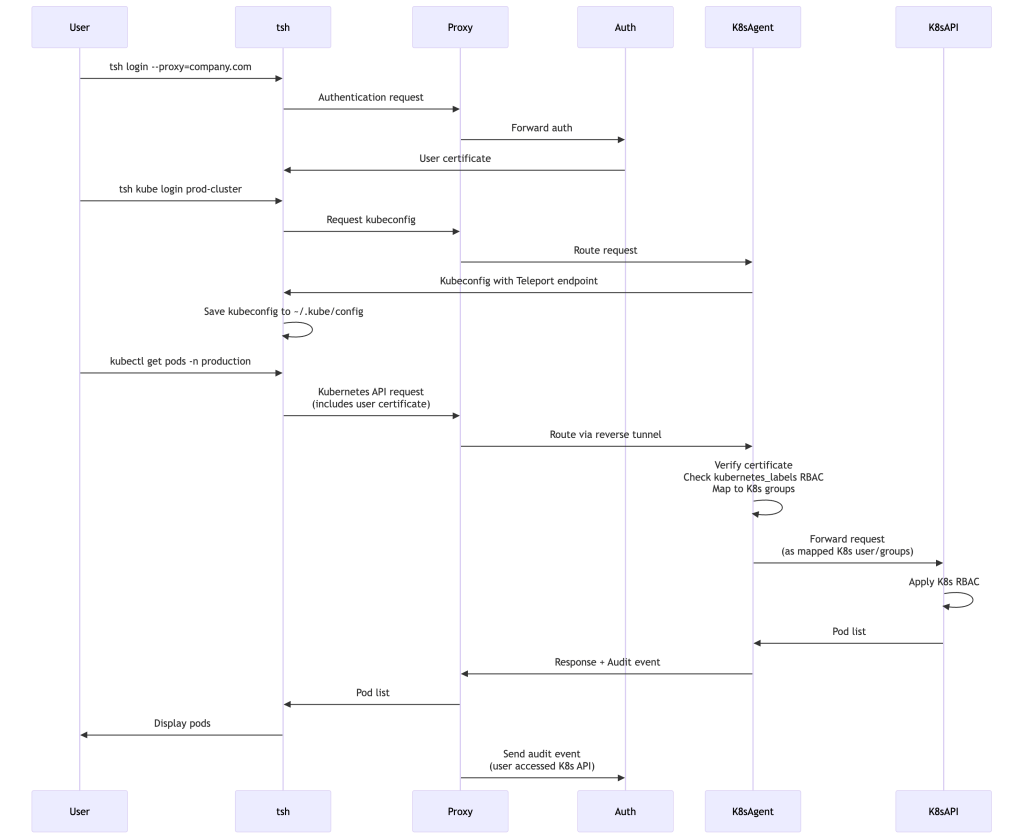
Example 3: Kubernetes Cluster Access
Getting Started with Teleport\
Quick Start: Local Testing
Get Teleport running locally in minutes:
# Download and install Teleportcurl https://goteleport.com/static/install.sh | bash# Generate configsudo teleport configure > /etc/teleport.yaml# Start Teleport (Auth + Proxy + Node)sudo teleport start# In another terminal, create a usersudo tctl users add myuser --roles=editor,access# Login with the usertsh login --proxy=localhost:3080 --user=myuser# Connect to the local nodetsh ssh root@localhos
Common Deployment Topologies
Teleport can be deployed in multiple architectures depending on scale, availability needs, and geographic distribution.
Below are the most common deployment patterns.
1. Single-Node Deployment (Development / Small Teams)
The simplest deployment runs Auth, Proxy, and Node services together on one machine.

Best for:
- Local testing
- Small internal environments
- Proof-of-concepts
Tradeoff:
- Not highly available
- Control plane is a single point of failure
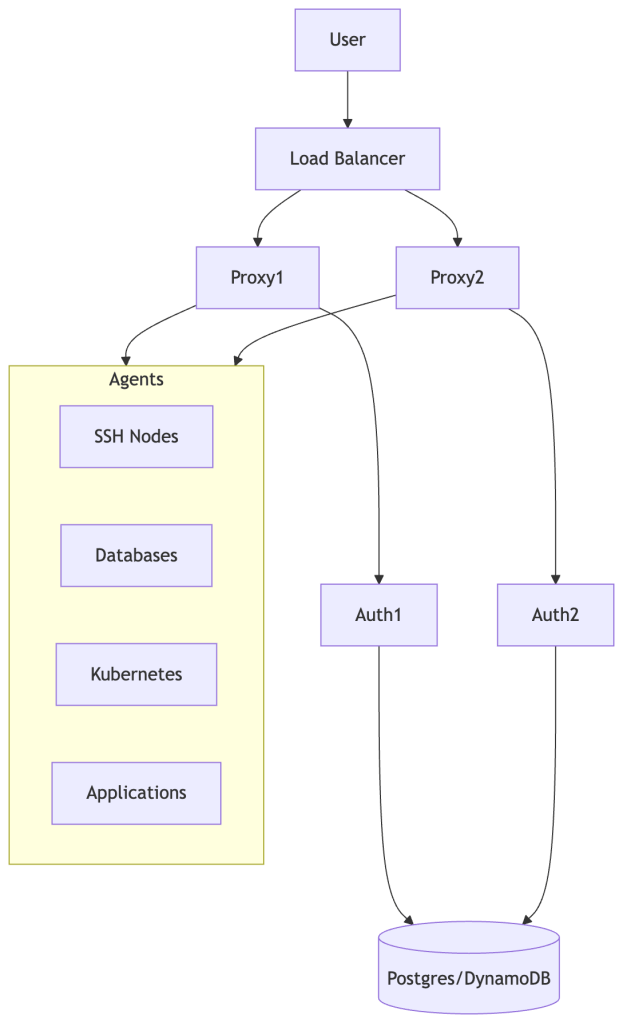
2. High Availability Deployment (Production)
In production, Teleport is typically deployed with multiple Proxies and Auth nodes backed by a shared database.
Best for:
- Enterprise production deployments
- Thousands of users/sessions
- Resilience against failures
Key Properties:
- Proxies scale horizontally
- Auth services share backend state
- Agents connect outbound via reverse tunnels
3. Multi-Region / Global Deployment (Trusted Clusters)
Large organizations often run separate clusters per region, connected through Trusted Clusters.
Best for:
- Multi-region infrastructure
- Mergers/acquisitions
- Customer-isolated environments (MSPs)
Benefits:
- Centralized identity with regional isolation
- Independent RBAC boundaries per cluster
- Reduced latency by keeping access local
Choosing the Right Topology
| Situation | Recommended Topology | Reason |
|---|---|---|
| Dev/test, single team | Single-node | No ops overhead; failure has low blast radius |
| Production, single region | HA (multi-Proxy, multi-Auth, shared backend) | Auth or Proxy failure must not gate all access |
| Multi-region, latency-sensitive | HA + Trusted Clusters | Keep session traffic local; centralize identity |
| MSP or multi-tenant | Trusted Clusters per tenant | Hard isolation boundary; independent RBAC per cluster |
| Acquisition integration | Trusted Clusters | Federate identity without merging infrastructure |
The core rule: a single-node Teleport is acceptable only where downtime is acceptable. For any environment where access outages have consequences — on-call response, incident handling, production deployments — HA is not optional.
Teleport’s architecture is flexible enough to evolve as your infrastructure grows. Start with single-node, promote to HA, extend to federation — each step is a configuration change, not a rebuild.
Production Deployment Checklist
- Design Your Architecture
- Determine if using Teleport Cloud or self-hosted
- Plan for high availability
- Choose backend storage (DynamoDB + S3, PostgreSQL, etcd, or Firestore)
- Deploy Control Plane
- Deploy Auth Service with HA backend
- Deploy Proxy Service behind load balancer
- Configure TLS certificates
- Set up DNS records
- Integrate Identity Provider
- Configure SSO (Okta, GitHub, Google, SAML)
- Define role mapping from SSO to Teleport roles
- Enable MFA requirements
- Deploy Agents
- Install agents on servers, databases, Kubernetes clusters
- Configure appropriate services per agent
- Set up resource labels for RBAC
- Enable auto-discovery where applicable
- Configure RBAC
- Define roles based on job functions
- Use label-based access control
- Set appropriate certificate TTLs (hours, configurable)
- Configure access request workflows
- Enable Audit and Compliance
- Configure session recording
- Set up audit log forwarding
- Configure retention policies
- Integrate with SIEM if needed
- Train Users
- Provide documentation for
tshcommands - Explain certificate-based authentication
- Document access request process
- Share best practices
Performance and Scaling Considerations
Connection Flow Overhead
Teleport adds minimal latency to connections:
- Initial Authentication: One-time certificate issuance (1-2 seconds)
- Connection Establishment: Certificate validation (milliseconds)
- Data Transfer: After connection establishment, Teleport introduces minimal but non-zero overhead — primarily from TLS termination at the Proxy, connection multiplexing through the reverse tunnel, and optional session recording. In practice this is imperceptible for interactive sessions, but measurable for high-throughput database or bulk-transfer workloads.
The certificate model means Teleport doesn’t need to be consulted for every packet, only for initial connection establishment.
Scaling Characteristics
Large-scale Teleport deployments can support:
- Concurrent Sessions: Thousands of concurrent sessions — practical limits are driven by Proxy CPU/memory, backend IOPS, and whether session recording is enabled. Proxy-mode recording is significantly heavier than node-mode recording at scale.
- Agents: Each agent establishes persistent reverse tunnel connections (typically one or a small pool, scaling dynamically under load). Tens of thousands of registered nodes are achievable with a well-sized backend.
- Users: Large user bases supported (limits depend on backend performance and Auth Service sizing)
- Resources: Tens of thousands of resources in inventory
Reality Check on Scale:
Teleport scales well, but scaling is not automatic — it is constrained by clear bottlenecks:
- Backend IOPS and storage performance
- Proxy CPU and memory resources
- Audit event throughput and processing
- Network bandwidth for session traffic
High-Performance Deployments
For large-scale deployments:
- Deploy multiple Proxy Service instances
- Use multiple Auth Service instances with shared backend
- Distribute agents across regions
- Use high-performance backend (DynamoDB with provisioned capacity, tuned PostgreSQL)
- Enable local caching on agents
- Scale DB Agents horizontally for high connection volumes
Real-world bottleneck pattern — Database Access:
At scale, database access tends to become the first performance bottleneck teams hit. DB agents must multiplex many client connections, each of which requires TLS termination and proxying. Unlike SSH sessions (which are long-lived and low-overhead once established), database workloads often involve frequent short-lived connections that amplify this cost. Connection pooling behavior at the agent level matters significantly — teams typically need to scale DB agents horizontally earlier than they expect, and often before any other component shows strain.
Best Practices
1. Certificate TTL Configuration
Keep TTLs as short as practical. Short TTLs are the primary lever for limiting blast radius on compromised credentials — an attacker with a stolen certificate can only use it until it expires.
# Short TTLs for production accesskind: rolemetadata: name: production-accessspec: options: max_session_ttl: 4h # 4h is a good default; adjust down if re-auth friction is acceptable# Longer TTLs for developmentkind: rolemetadata: name: dev-accessspec: options: max_session_ttl: 24h
Rule of thumb: Production ≤ 8h (4h recommended). Bots/automation ≤ 1h. Dev ≤ 24h. Never set TTL longer than your incident response SLA.
2. Use Access Requests for Elevated Privileges
Never grant permanent production access to human users. Use time-bounded requests instead — the approval friction is a feature, not a bug. Require a reason; it creates accountability and a paper trail that’s useful in audits and post-incident reviews.
kind: rolemetadata: name: developerspec: allow: request: roles: ['production-access'] thresholds: - approve: 1 deny: 1 # Require a reason — surfaces intent and aids audit trails annotations: reason: "Required for all production access requests"
3. Implement a Governed Resource Labels Strategy
Treat labels as a typed contract, not freeform metadata. Define your schema upfront and enforce it via IaC (Terraform, Pulumi). Ad-hoc labeling leads to RBAC drift — resources silently entering or leaving access scope without review.
# Consistent labeling scheme — define this schema org-wide and enforce itssh_service: labels: env: production # Required: dev | staging | production team: backend # Required: maps to owning team region: us-west-2 # Required: for geo-scoped roles compliance: pci-dss # Optional: compliance scope tags
Rule of thumb: If a label isn’t defined in your schema, it shouldn’t be on a resource. Audit for unlabeled or non-conforming resources regularly.
4. Enable Session Recording for All Production Access
Always record production sessions. Storage cost is negligible compared to the forensic and compliance value. Use node mode for large fleets (distributes load); use proxy mode when tamper-resistance from the agent side is a compliance requirement.
kind: rolemetadata: name: production-accessspec: options: record_session: desktop: true default: node # Use 'proxy' if you need centralized, tamper-resistant recording
Development roles can use default: off to reduce storage costs, but staging environments should mirror production recording policy.
5. Integrate with Your Security Stack
- Forward audit logs to SIEM (Splunk, Elasticsearch)
- Send alerts to incident response tools
- Integrate access requests with ticketing systems
- Use webhooks for custom workflows
Failure Modes and Operational Realities
Understanding failure behavior is essential for operating Teleport in production. A system you can’t reason about under failure is a system you can’t trust.
Component Failure Behavior
| Component | Failure Impact | Active Sessions | New Sessions |
|---|---|---|---|
| Auth Service | Cannot issue new certificates | Continue (until cert expires) | Blocked |
| Proxy Service | All inbound access unavailable | Dropped | Blocked |
| Backend (DB/DynamoDB) degraded | Auth latency spikes, audit log lag | Likely continue (cached state) | Degraded/slow |
| Single Proxy in HA cluster | Remaining proxies absorb traffic | Disrupted briefly | Rerouted |
| Agent | Resources behind that agent unreachable | Terminated | Blocked for those resources |
Key takeaways:
- The Auth Service is the highest-impact single point of failure in a non-HA deployment. Existing sessions continue until their certificate TTL expires, but no new access can be established. This is the #1 reason to deploy Auth in HA mode for any production environment.
- Proxy failure is immediately user-visible — all active sessions terminate. Multiple Proxies behind a load balancer are non-negotiable for production.
- Backend degradation creates a “slow door” scenario: the system keeps working but sluggishly, often producing confusing timeout errors that look like network issues.
CA Rotation
CA rotation is the nuclear option for credential invalidation — it invalidates all outstanding certificates cluster-wide. This is powerful but operationally non-trivial:
- Rotation has a grace period where both old and new CA are trusted simultaneously
- All agents must pick up the new CA before the grace period ends
- Any agent that doesn’t rotate in time will start rejecting connections
- Rotation of a large fleet requires careful monitoring and rollout coordination
Rule of thumb: Test CA rotation in staging at least once before you need it in production under incident conditions.
RBAC Sprawl
Label-based RBAC scales beautifully at small size and becomes a maintenance burden at scale if not governed:
- Undocumented labels on resources create invisible access grants
- Role proliferation — teams creating one-off roles instead of composing existing ones — makes audit reviews painful
- Label drift — resources retagged without RBAC review can accidentally expand access
Treat labels as a contract, not metadata. Enforce label schemas via infrastructure-as-code and audit them as part of change review.
Debugging is Harder Than Direct SSH Because Teleport Introduces Multiple Control Points — Each a Potential Failure Boundary
Teleport adds indirection. When access fails, the failure could be at any layer:
- Certificate expired or wrong cluster
- RBAC label mismatch
- Reverse tunnel down (agent offline)
- Proxy routing issue
- Network connectivity between Proxy and Agent
- Resource itself refusing connection
The tsh status, tctl nodes ls, and Proxy Service logs are your first three debugging tools. Build runbooks for common failure paths before you need them at 2am.
Trade-offs, Limitations, and Alternatives
Teleport Trade-offs
| Area | Trade-off |
|---|---|
| Latency | Teleport adds an extra network and TLS hop on every connection — negligible for interactive SSH sessions, but noticeable for high-throughput or latency-sensitive database workloads. Benchmark before assuming it’s acceptable. |
| Complexity | You’re now operating a control plane (Auth + Proxy + Backend). This is less complex than a VPN + bastion + key management stack, but it’s still infrastructure you own and must keep healthy. |
| Lock-in | Strong coupling to Teleport’s certificate model, RBAC system, and agent deployment. Migrating away is non-trivial. |
| Debugging | Failures are less transparent than direct SSH. Every hop is a potential failure point. |
| Cost | Self-hosted requires infra + ops investment. Enterprise features (Device Trust, Access Monitoring, Policy) add license cost. |
| CA rotation | Invalidating all credentials is operationally complex and requires advance planning. |
What Teleport Does NOT Solve
Teleport enforces access at the entry point, not within the system. It secures the path to infrastructure — it does not secure what happens inside infrastructure after access is granted:
- Application-level authorization: Teleport gets you a shell or a DB connection. What you do with it is governed by application and database permissions, not Teleport.
- Lateral movement inside a host: Once a user has SSH access to a server, they can attempt to move laterally to other systems reachable from that host. Teleport doesn’t prevent this.
- Compromised workloads: If a service running on a server is compromised, that service can use its existing credentials. Teleport doesn’t protect against post-exploitation of running workloads.
- Secrets inside applications: Environment variables, config files, and secrets managers are outside Teleport’s scope.
- Insider threats post-access: Teleport records what was done, which helps with detection and forensics — but it doesn’t prevent a malicious authorized user from exfiltrating data during their session.
Teleport is one layer of a defense-in-depth strategy, not a complete security posture.
Comparison With Modern Alternatives
Teleport is not the only approach to modern infrastructure access:
| Tool | Model | Strengths | Weaknesses vs Teleport |
|---|---|---|---|
| AWS SSM / IAM Identity Center | Infrastructure-native | No agent to maintain on AWS resources, native IAM integration | AWS-only, limited protocol support, weaker audit UI |
| Cloudflare Access / Zero Trust | Identity-aware proxy | Excellent for web apps and browser-based access, global PoPs | Weaker for SSH/DB/K8s native protocol support |
| Tailscale | Mesh VPN + identity | Very simple to operate, low overhead, great for small teams | No session recording, weaker RBAC, not compliance-oriented |
| BeyondCorp (Google) | Device + identity aware proxy | Proven at extreme scale | Expensive, complex to replicate outside Google’s ecosystem |
| CyberArk / HashiCorp Vault | PAM / secrets management | Deep secrets management, strong enterprise PAM | More complex to operate, less developer-friendly UX |
Where Teleport fits: Teleport sits between identity-aware proxies (Cloudflare, BeyondCorp) and infrastructure-native access systems (SSM). It offers deeper protocol-level control and richer session recording than most ZTNA tools, at the cost of a more complex control plane to operate.
When Teleport Becomes a Bad Idea
Teleport shines in complexity — not simplicity. There are clear situations where adopting it is the wrong call:
- 100% AWS with SSM already working well: If your infrastructure is AWS-native and your team already uses SSM + IAM Identity Center effectively, Teleport adds a new control plane without proportionate gain. SSM is simpler to operate and deeply integrated with IAM.
- Small teams (< 10 engineers): The operational overhead — HA deployment, CA rotation, RBAC governance, agent fleet management — often outweighs the security benefits at small scale. A well-configured bastion with short-lived keys and MFA may be the right answer.
- Cannot operate HA control planes reliably: If you are not prepared to operate a highly available control plane, Teleport becomes a single point of failure rather than a security improvement. A single-node Auth Service gates every infrastructure connection in your environment — that’s a harder failure than a downed bastion, which only blocked SSH.
- Ultra-low latency or high-throughput DB access: Every connection transits the Proxy. For latency-sensitive or bulk-transfer database workloads, the proxying overhead is real and measurable. Benchmark before committing.
- Team lacks operational maturity for a distributed control plane: Teleport failures are subtle. A team that isn’t comfortable debugging reverse tunnel health, CA states, and RBAC label interactions will find it harder to operate than what it replaced.
The honest test: If someone on your team can’t answer “what happens when the Auth Service goes down?”, you’re not ready to run Teleport in production.
How Teams Typically Adopt Teleport
Teleport adoption is rarely a single migration — it’s an incremental replacement of legacy access patterns. Teams that succeed tend to follow a similar path:
- Replace bastion SSH access — lowest risk, highest immediate visibility gain
- Add Kubernetes and database access — consolidates the access model across protocols
- Introduce Access Requests for production — eliminates standing privileges for the highest-risk tier
- Enable session recording for compliance — adds the audit trail needed for SOC 2, PCI, HIPAA
- Expand into multi-cluster federation — scales the model to multiple regions or business units
Each stage delivers value independently. You don’t need to complete stage 5 to justify the investment at stage 1.
Opinionated Architecture Guidance
Rules of Thumb for Production Deployments
These aren’t configuration options — they’re operational decisions that most teams learn the hard way:
Certificate TTLs:
- Production access: ≤ 8 hours. Shorter is better. 4 hours is a reasonable default.
- Bot/automation tokens: ≤ 1 hour. Treat like API keys with aggressive expiry.
- Development access: 24 hours is acceptable. Convenience at lower risk.
- Never set
max_session_ttllonger than your incident response SLA — if a credential is compromised, you need it to expire before your team can respond.
Access design:
- Never grant direct production roles to humans. Always require Access Requests with approval for elevated access. The friction is the feature.
- Treat labels as a typed API, not freeform metadata. Define a label schema (env, team, region, compliance) and enforce it via IaC. Label drift creates silent access grants.
- Prefer role composition over role proliferation. Five composable roles are easier to audit than fifty specialized ones.
Cluster topology:
- Use a single cluster until you have a concrete reason not to. Trusted Clusters add operational overhead — don’t adopt them for organizational tidiness alone.
- Reach for Trusted Clusters when: you need hard security isolation between environments (e.g., production vs. customer tenants), you’re operating in multiple regions with latency-sensitive access, or you’re managing customer-isolated environments as an MSP.
- Avoid auto-discovery in highly dynamic environments without governance controls on labeling — auto-discovered resources with unreviewed labels can silently enter RBAC scope.
Session recording:
- Use
nodemode for large fleets. The distributed load model scales better. - Use
proxymode when you have strict compliance requirements and need recording to be tamper-proof from the agent side. - Always record production. Storage cost is negligible compared to the compliance and forensic value.
Troubleshooting Common Issues
Debugging Mental Model: Always trace the path: User → Proxy → Tunnel → Agent → Resource. Failures almost always occur at boundaries between these layers — start at the user end and walk forward until you find where the chain breaks.
Teleport adds multiple layers between a user and a resource. When something fails, work through the layers in order rather than jumping straight to logs. Most failures are in layers 1–3.
Layer 1: Certificate (user) → tsh statusLayer 2: RBAC / label match → tctl get roles, check node labelsLayer 3: Agent health → tctl nodes ls, agent logsLayer 4: Reverse tunnel → Proxy logs, tctl statusLayer 5: Network (Proxy ↔ Agent) → connectivity check, firewall rulesLayer 6: Resource itself → resource-side logs
Concrete example — SSH connection fails:
1. tsh ssh prod-server fails → tsh status: cert valid, roles present ✓ → tctl nodes ls: prod-server not in list ✗2. Agent offline — check agent logs on the server → Agent can't reach Proxy on port 443 → Firewall rule blocking outbound from the new subnet ✗Resolution: Add egress rule. Agent reconnects, node appears in inventory.Key insight: The failure looked like an SSH problem.It was a network problem between Agent and Proxy — two layers removed from where the user felt the error.
Most issues are not in the SSH layer — they are in the identity or routing layers above it.
Connection Issues
Problem: Cannot connect to a resource through Teleport
Check:
- Certificate is not expired:
tsh status - User has appropriate role:
tsh statusshows roles - Resource labels match role’s
node_labels/db_labels/ etc. — this is the most common silent failure - Agent is online:
tctl nodes lsor Web UI (offline agent = resource disappears from inventory) - Reverse tunnel is established: Check Proxy Service logs for tunnel registration events
Certificate Issues
Problem: Certificate verification failures
Causes:
- Certificate expired (re-login with
tsh login) - CA rotation in progress — agents that haven’t yet picked up the new CA will reject connections; monitor rotation progress carefully
- Time skew between systems (sync NTP — even a few seconds of drift causes cert validation to fail)
- Wrong cluster (verify
--proxyparameter matches the target cluster)
Performance Issues
Problem: Slow connections or timeouts
Check:
- Network latency between Proxy and Agent — the reverse tunnel adds a round-trip; high-latency paths between Proxy and Agent are directly user-visible
- Backend storage performance — slow DynamoDB or PostgreSQL manifests as slow auth, slow resource listing, and delayed audit writes
- Session recording mode —
proxymode under high load is a common but non-obvious bottleneck; consider switching tonodemode or scaling Proxy horizontally - Reverse tunnel health — a degraded tunnel causes intermittent timeouts that are easy to mistake for network issues
- Agent resource usage (CPU, memory) — DB agents under high connection volume are a frequent culprit
Conclusion
Teleport represents a meaningful shift in how organizations secure infrastructure access — replacing long-lived credentials with short-lived certificates, eliminating VPN perimeters with reverse tunnels, and providing comprehensive audit logging across protocols.
But it’s worth being precise about what that shift entails. Teleport is not just an access tool — it is a distributed identity and access control plane that sits on the critical path of every infrastructure connection. You operate it, rotate its CA, govern its RBAC, and debug it at 2am. The security benefits are real. So are the operational costs.
Key Takeaways:
- Certificate-Based Authentication: As covered in the architecture section, short-lived certificates eliminate standing credentials — but authorization still depends on centrally issued roles, and revocation requires CA rotation or lockout, not a simple flag.
- Zero Trust Architecture: Every connection is independently authenticated and authorized, regardless of network location. Teleport eliminates network-based trust — it does not eliminate the need for application-level authorization, secrets management, or lateral movement controls.
- Unified Access: Single platform for SSH, Kubernetes, databases, applications, and desktops.
- Protocol Native: Works with existing tools (
ssh,kubectl,psql) without requiring new clients. - Comprehensive Audit: Complete visibility into who accessed what, when, and what they did — session recording, event logs, and Access Request trails.
- Operationally Non-Trivial: HA deployment, CA rotation planning, RBAC governance, and debugging skills are requirements for production, not afterthoughts.
For teams that outgrow VPN + bastion + manual key rotation, Teleport is one of the most complete infrastructure access platforms available. The architecture is sound, the developer experience is strong, and the compliance story is well-developed. Adopt it with eyes open to the operational investment it requires, and it will pay dividends in security posture and audit readiness.
Additional Resources
- Official Documentation: https://goteleport.com/docs/
- GitHub Repository: https://github.com/gravitational/teleport
- Community Forum: https://github.com/gravitational/teleport/discussions
- Architecture Reference: https://goteleport.com/docs/reference/architecture/
- Security Whitepaper: Available on Teleport website
- Compliance Documentation: SOC 2, FedRAMP, and other certifications
- NotebookLM Link

Leave a comment