Who is this for? Someone who has never touched Kubernetes but wants to understand it well enough to discuss it confidently — and even run a few things on their laptop.
Important mindset note: Kubernetes is not Heroku or a full application platform. It does not build your app, manage your CI/CD pipeline, or automatically apply production best practices. It is an orchestration system — a very powerful one — but you still have to bring your own containers, configuration, security posture, and operational practices. Think of it as an incredibly capable infrastructure layer, not a magic button.
Table of Contents
- Part 1 — What Problem Does Kubernetes Solve?
- Part 2 — Core Concepts: The Kubernetes Vocabulary
- Part 3 — The Architecture: How It All Fits Together
- Part 4 — Hands-On: Your First Kubernetes App
- Part 5 — Deployments, Scaling, and Self-Healing
- Part 6 — Networking: Services and How Apps Talk to Each Other
- Part 7 — Configuration and Secrets
- Part 8 — Storage: Keeping Data Alive
- Part 9 — Observability: Knowing What’s Going On
- Part 10 — Putting It All Together: The Big Picture
- Appendix — Common Beginner Mistakes
Part 1 — What Problem Does Kubernetes Solve?
The World Before Kubernetes
Imagine you’ve built a web app. It runs on a single server. Life is simple. But then:
- Traffic spikes — your server buckles.
- A new version breaks everything — you have downtime.
- Your server crashes at 2am — the app is down until someone wakes up.
- You need to run 10 copies of the app — you SSH into 10 machines manually.
This is the problem Kubernetes was built to solve.
Containers First
Before Kubernetes, you need containers. A container is a lightweight, self-contained package that includes your app and everything it needs to run (libraries, runtime, config). Think of it as a shipping container: standardized, portable, stackable.
🐳 Docker popularized containers. If you haven’t already, install Docker Desktop or an alternative like Podman:
So What Is Kubernetes?
Kubernetes (often abbreviated as K8s — 8 letters between K and s) is an open-source system for automating deployment, scaling, and management of containerized applications.
In plain English: Kubernetes is the conductor of an orchestra of containers. You declare what you want running, and it figures out how to make it happen and continuously keeps it that way.
Key Promises of Kubernetes
| Promise | What it means |
|---|---|
| Self-healing | Crashed containers are restarted automatically |
| Scaling | Add or remove instances based on load |
| Rolling updates | Deploy new versions with zero downtime |
| Service discovery | Apps find each other without hardcoded IPs |
| Load balancing | Traffic is spread across healthy instances |
What Kubernetes Does NOT Solve (Out of the Box)
This is important to know upfront so you’re not surprised later:
| Gap | What fills it |
|---|---|
| CI/CD pipelines | Jenkins, GitHub Actions, ArgoCD, Tekton |
| Container image security scanning | Trivy, Snyk, Harbor |
| Secret rotation | HashiCorp Vault, Sealed Secrets |
| Observability by default | You add Prometheus, Grafana, Loki yourself |
| Multi-region failover | Cluster federation, multi-cluster tools |
| App building/packaging | Helm, Kustomize, your own Dockerfile |
A Note on History
Kubernetes was created by Google (based on their internal system called Borg) and open-sourced in 2014. It’s now maintained by the Cloud Native Computing Foundation (CNCF) and is the de facto standard for container orchestration.
Version awareness: Kubernetes releases 3 minor versions per year (e.g., v1.28, v1.29, v1.30). APIs and behaviors can change between versions. Always check the Kubernetes changelog and verify compatibility with your cluster’s version.
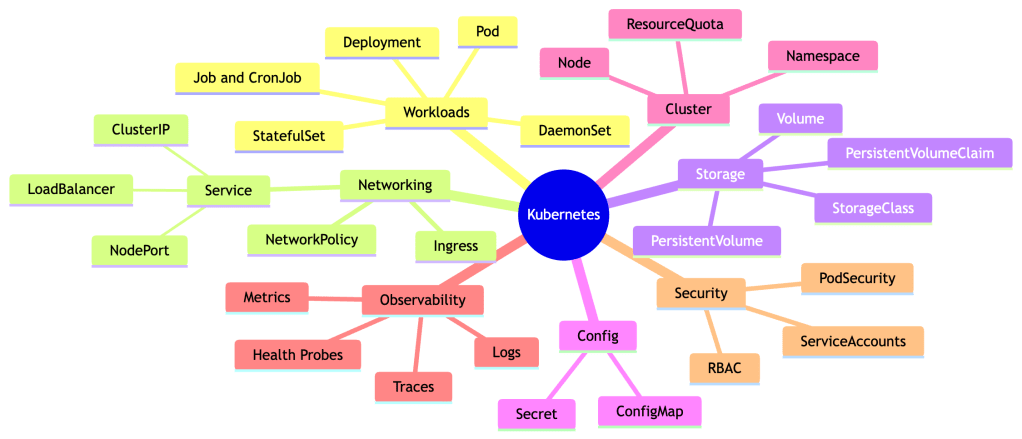
Part 2 — Core Concepts: The Kubernetes Vocabulary
One reason Kubernetes feels intimidating is the terminology. Let’s demystify the key terms with real-world analogies.
Kubernetes Is a Declarative, Desired-State System
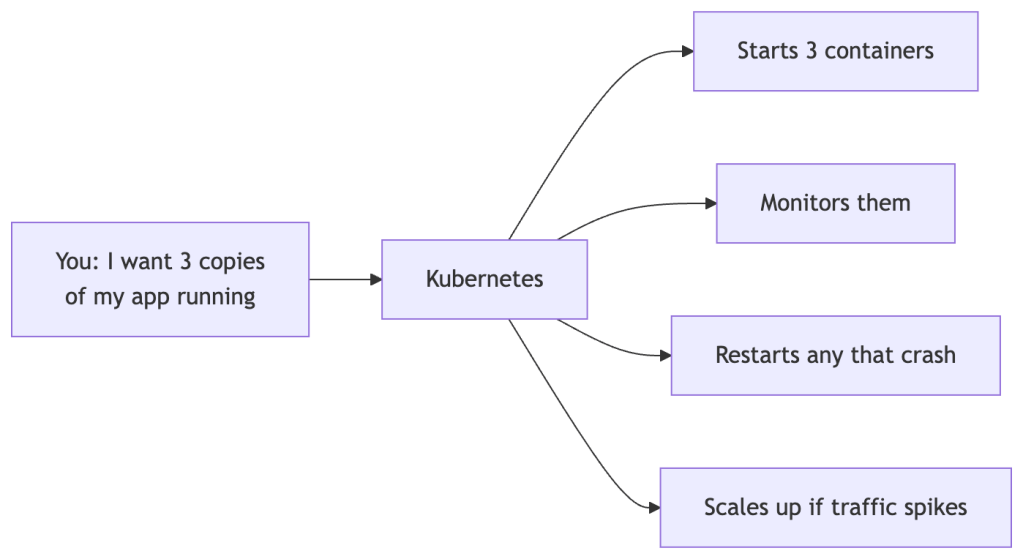
This is the most important idea in the whole series. In Kubernetes, you don’t issue commands like “start this container now.” Instead, you describe what you want to exist, and Kubernetes continuously works to make reality match that description.
Declarative: “I want 3 copies of my app running.”
Imperative: “Start container 1. Start container 2. Start container 3.”
Kubernetes is always declarative. Your YAML files express desired state. The system stores that desired state and reconciles it with reality forever.
The Cluster
A cluster is the entire Kubernetes environment — the collection of machines that Kubernetes manages together as one system.

Nodes
A node is an individual machine (physical or virtual) in the cluster. There are two types:
- Control Plane node — the brain. It makes decisions about the cluster and stores desired state.
- Worker nodes — where your actual application containers run.
Analogy: If the cluster is a restaurant, the control plane is the kitchen manager who tracks all the orders, and worker nodes are the individual chefs who actually cook.
Pods
A Pod is the smallest deployable unit in Kubernetes. A Pod wraps one or more containers that should always run together and share the same network and storage.
Analogy: If a container is a single fish, a Pod is the fish tank. Usually one fish per tank, but sometimes a few that need to live together.
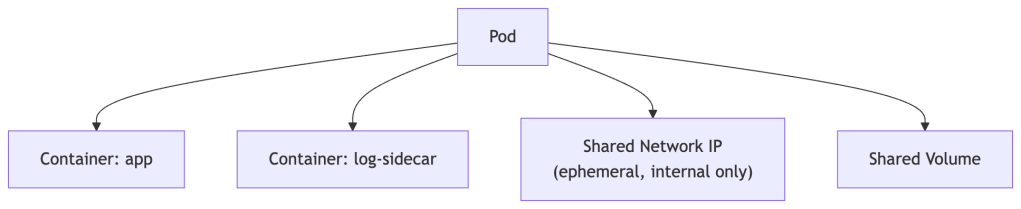
Key facts about Pods:
- Pods are ephemeral — they can be killed and replaced at any time.
- Each Pod gets its own IP address inside the cluster’s internal network. That IP is not routable outside the cluster and changes every time the Pod is rescheduled. Never hardcode a Pod IP.
- You rarely create Pods directly — you use higher-level abstractions like Deployments.
Deployments
A Deployment tells Kubernetes: “I want X copies of this Pod running at all times, and here’s how to roll out changes safely.” It manages the full lifecycle of Pods — creating them, replacing crashed ones, and orchestrating updates.
Services
A Service gives Pods a stable network identity. Since Pods die and get new IPs constantly, a Service acts as a consistent entry point that routes traffic to healthy Pods matching a label selector.
Analogy: A Service is like a restaurant’s phone number. The chefs (Pods) might change, but you always call the same number.
Namespaces
Namespaces are virtual partitions within a cluster. They let you organize and isolate resources — commonly used to separate environments (dev/staging/prod), teams, or projects within the same physical cluster.
ConfigMaps and Secrets
- ConfigMap — stores non-sensitive configuration data (e.g., environment variables, config files).
- Secret — stores sensitive data (e.g., passwords, API keys). Stored base64-encoded in etcd; base64 is encoding, not encryption.
Volumes and PersistentVolumes
Containers are stateless by default — their filesystem disappears when they stop. Volumes attach storage to Pods. PersistentVolumes (PV) are cluster-level storage resources that outlive individual Pods.
Quick Vocabulary Reference
| Term | One-liner |
|---|---|
| Cluster | The whole Kubernetes environment |
| Node | A machine in the cluster |
| Pod | One or more containers scheduled together |
| Deployment | Manages desired state and updates of Pods |
| Service | Stable network endpoint that routes to Pods |
| Namespace | Virtual partition within a cluster |
| ConfigMap | Non-sensitive config data |
| Secret | Sensitive config data (base64-encoded at rest by default) |
| PersistentVolume | Storage that survives Pod restarts |
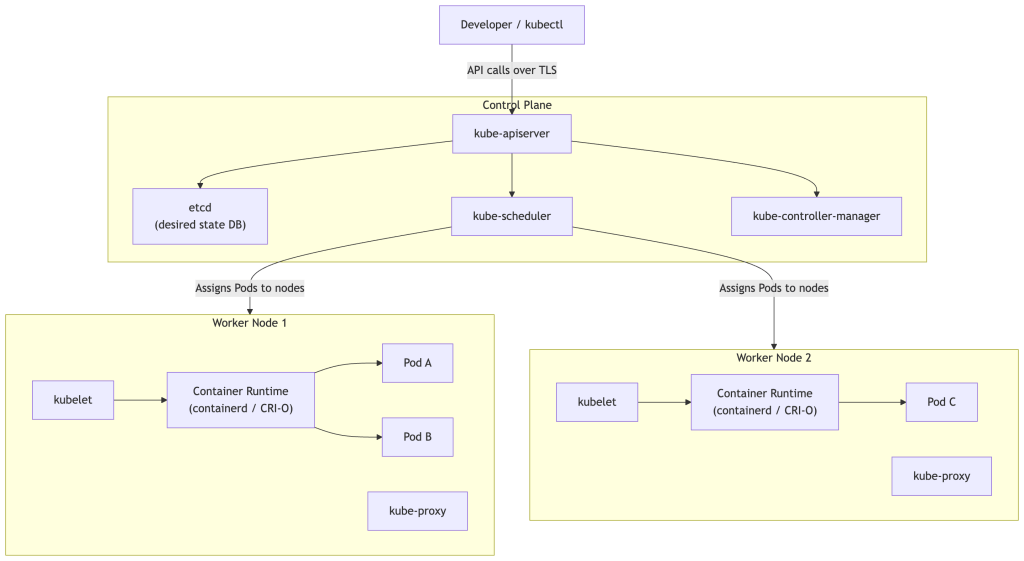
Part 3 — The Architecture: How It All Fits Together
The Big Picture
Control Plane Components
API Server (kube-apiserver)
The front door to Kubernetes. Every command you run (via kubectl or any tool) goes through the API server over TLS. It validates requests, enforces authentication and authorization, and persists state to etcd.
etcd
A distributed key-value store that holds the desired state of the entire cluster — what resources exist, their configuration, and their status. If etcd is healthy and you have functioning nodes and storage backends, Kubernetes can reconstruct all workloads from scratch because the desired state is fully preserved there. Note that etcd does not store your container images, PersistentVolume data, or node OS state — those live elsewhere.
Scheduler (kube-scheduler)
Watches for newly created Pods that have no node assigned, then selects the best node to run them based on resource requests, node capacity, affinity rules, and other constraints.
Controller Manager (kube-controller-manager)
Runs a collection of controllers — background loops that watch the cluster state and take actions to move toward the desired state. The Deployment controller ensures the right number of Pod replicas are running. The Node controller notices when nodes go down. There are dozens of built-in controllers.
Worker Node Components
kubelet
An agent that runs on every worker node. It watches the API server for Pods assigned to its node and instructs the container runtime to start or stop containers accordingly. It also reports Pod health back to the control plane.
kube-proxy
Maintains network forwarding rules (traditionally via iptables or IPVS) on each node to implement Service routing. In modern clusters using eBPF-based networking (like Cilium), kube-proxy may be replaced entirely.
Container Runtime
The software that actually runs containers. Kubernetes uses the Container Runtime Interface (CRI) to support multiple runtimes. The most common today are containerd and CRI-O. Kubernetes previously communicated with Docker via a compatibility shim called dockershim, which was removed in Kubernetes v1.24.
The Reconciliation Loop (The Heart of Kubernetes)
This is the single most important concept to internalize. Kubernetes is always running reconciliation loops — comparing desired state with actual state and taking corrective action.

This loop never stops. If a Pod crashes at 3am, the controller loop notices within seconds and creates a replacement — no human intervention required.
Part 4 — Hands-On: Your First Kubernetes App
Setting Up a Local Cluster
You need a local Kubernetes environment. Pick one:
| Tool | Best for | Link |
|---|---|---|
| minikube | Beginners, most documentation | minikube.sigs.k8s.io |
| kind (Kubernetes in Docker) | Lightweight, CI-friendly | kind.sigs.k8s.io |
| k3d | Fastest startup, uses k3s | k3d.io |
| Docker Desktop (built-in K8s) | If you already have Docker Desktop | Enable in Settings → Kubernetes |
| Rancher Desktop | Open-source Docker Desktop alternative | rancherdesktop.io |
You’ll also need kubectl — the command-line tool to interact with Kubernetes:
Exercise 1: Start Your Cluster
# With minikubeminikube start# Verify your cluster is runningkubectl cluster-info# See your nodeskubectl get nodes
Expected output (version number will vary):
NAME STATUS ROLES AGE VERSIONminikube Ready control-plane 1m v1.28.0
Exercise 2: Deploy Your First App
Let’s deploy a simple web server (nginx):
# Create a deploymentkubectl create deployment my-nginx --image=nginx# Check it's runningkubectl get deploymentskubectl get pods
You should see a Pod with a status of Running.
Exercise 3: Expose It as a Service
# Expose the deployment as a servicekubectl expose deployment my-nginx --port=80 --type=NodePort# Get the URL (minikube only)minikube service my-nginx --url
Open the URL in your browser — you’ll see the nginx welcome page. 🎉
Exercise 4: Explore with kubectl
# Describe a pod (get detailed info, including Events)kubectl describe pod <pod-name># View logskubectl logs <pod-name># Get a shell inside a running containerkubectl exec -it <pod-name> -- /bin/bash# Delete everything you createdkubectl delete deployment my-nginxkubectl delete service my-nginx
Understanding kubectl Syntax
kubectl [command] [resource-type] [resource-name] [flags]kubectl get pods my-nginx-xxx -n default
Common commands: get, describe, create, apply, delete, logs, exec
Part 5 — Deployments, Scaling, and Self-Healing
Writing YAML (Declarative Configuration)
So far we’ve used imperative commands (kubectl create). The Kubernetes way is declarative — you write a YAML file describing desired state, and Kubernetes makes it real and keeps it that way.

Here’s a Deployment YAML with explanations:
# deployment.yamlapiVersion: apps/v1kind: Deploymentmetadata: name: my-app labels: app: my-appspec: replicas: 3 # Desired number of Pod copies selector: matchLabels: app: my-app # Manages Pods with this label strategy: type: RollingUpdate rollingUpdate: maxUnavailable: 25% # Max pods that can be down during update maxSurge: 25% # Max extra pods allowed during update template: # Pod template metadata: labels: app: my-app spec: containers: - name: my-app image: nginx:1.25 ports: - containerPort: 80 resources: requests: # Used by Scheduler to pick a node memory: "64Mi" cpu: "250m" limits: # Enforced at runtime by kubelet memory: "128Mi" cpu: "500m"
Resource Requests vs Limits — An Important Distinction
These two fields are frequently confused but serve very different purposes:
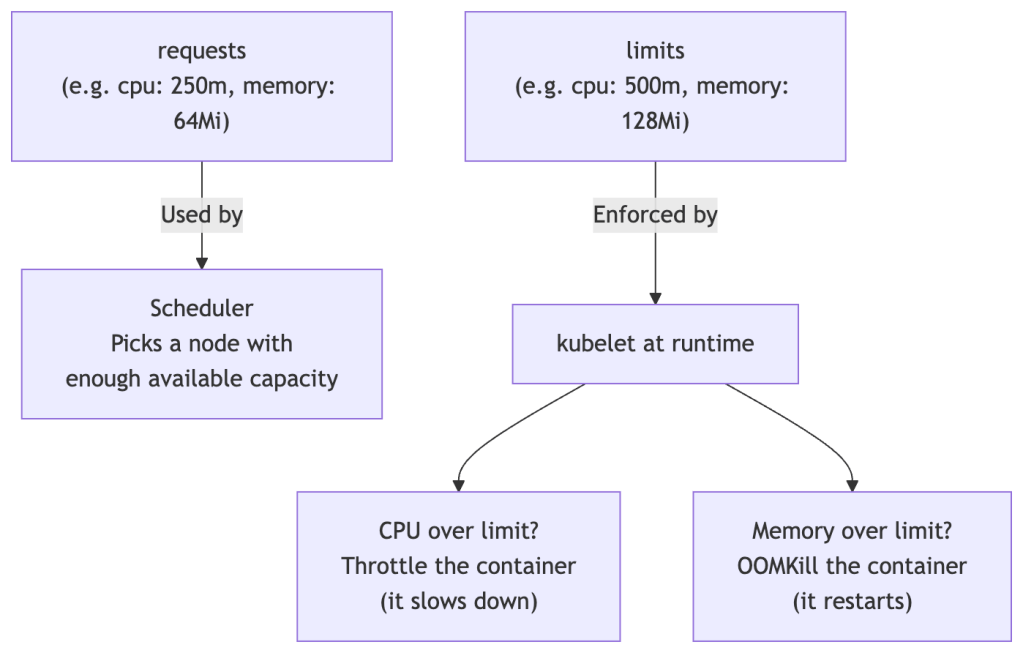
Always set resource requests. Without them, the scheduler has no information to make good placement decisions, and a single misbehaving app can starve other Pods on the same node.
Exercise 5: Apply a Deployment
# Save the YAML above as deployment.yaml, then:kubectl apply -f deployment.yaml# Watch Pods come to lifekubectl get pods --watch# See all 3 replicaskubectl get pods -l app=my-app
Exercise 6: Self-Healing in Action
# Delete one of the pods manuallykubectl delete pod <one-of-your-pod-names># Watch Kubernetes immediately create a replacementkubectl get pods --watch
Within seconds, a new Pod appears. This is self-healing — the controller loop noticed the gap between desired state (3 replicas) and actual state (2 replicas) and corrected it.
Exercise 7: Scaling
# Scale up to 5 replicaskubectl scale deployment my-app --replicas=5kubectl get pods# Or edit the YAML: change replicas: 3 to replicas: 5, then:kubectl apply -f deployment.yaml # The declarative way# Scale back downkubectl scale deployment my-app --replicas=2
Rolling Updates: Zero Downtime Deploys
When you update a Deployment (e.g., a new image version), Kubernetes performs a rolling update controlled by maxUnavailable and maxSurge. With 3 replicas and both set to 25% (rounded up to 1), the actual behavior looks like this:
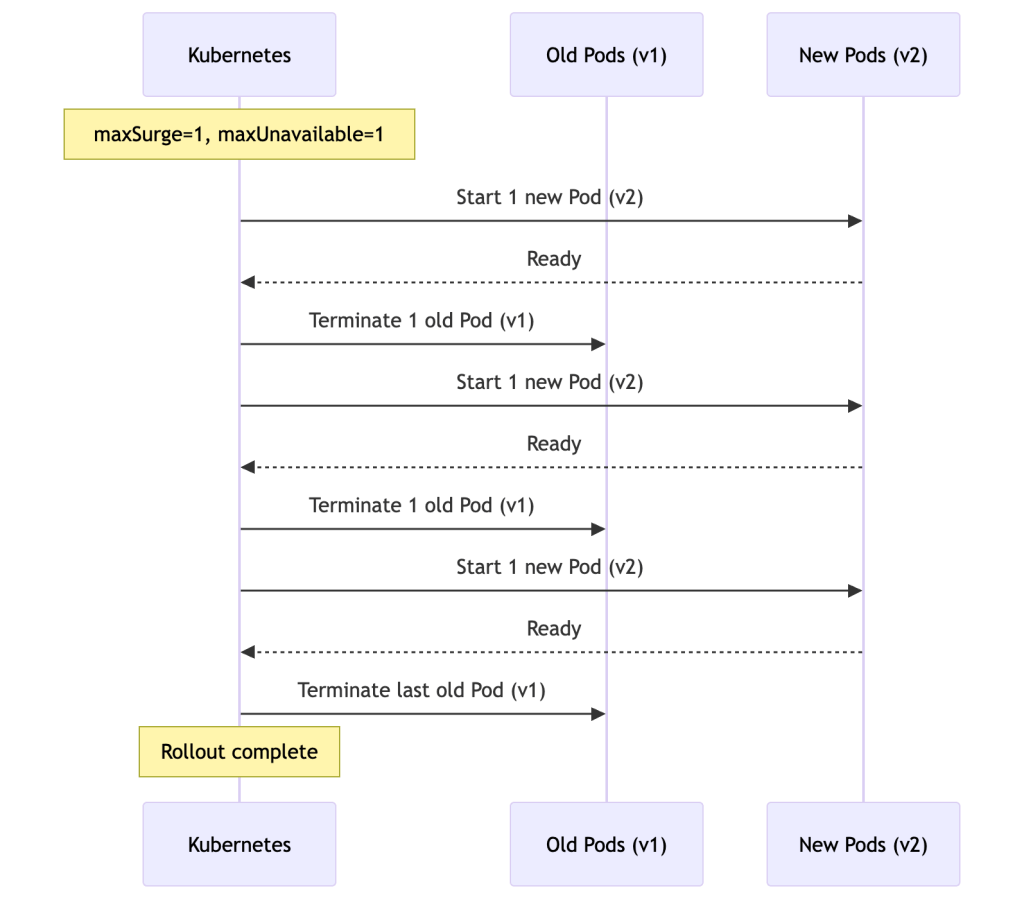
The exact pacing depends on your maxUnavailable and maxSurge settings — Kubernetes may create or terminate multiple Pods at once for faster rollouts.
# Trigger a rolling update by changing the image versionkubectl set image deployment/my-app my-app=nginx:1.26# Watch the rolloutkubectl rollout status deployment/my-app# View rollout historykubectl rollout history deployment/my-app# Rollback if needed!kubectl rollout undo deployment/my-app
Part 6 — Networking: Services and How Apps Talk to Each Other
The Problem: Pods Are Ephemeral
Pods get new IP addresses every time they’re created. Their IPs are only valid inside the cluster network. You can’t hardcode Pod IPs — they’ll change whenever a Pod restarts or gets rescheduled. This is why Services exist.
Service Types
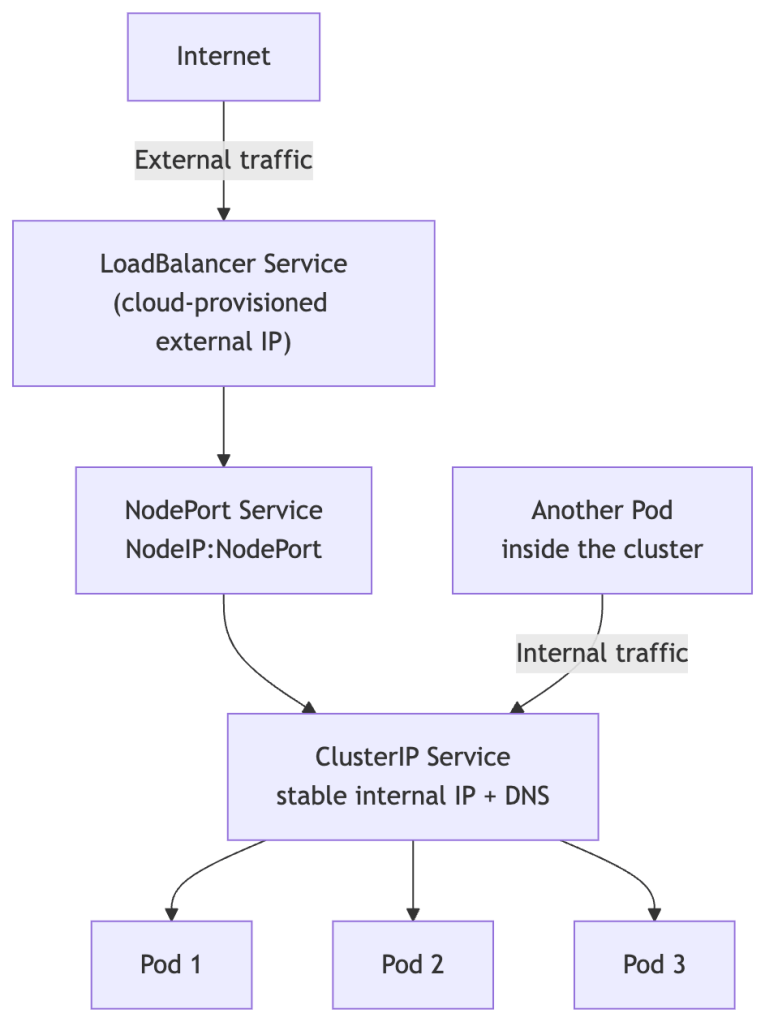
ClusterIP (default)
Only reachable within the cluster. Used for internal service-to-service communication. Gets a stable virtual IP and a DNS name.
NodePort
Exposes the service on a static port (30000–32767) on every node’s IP. Accessible from outside via <NodeIP>:<NodePort>. Useful for local development and testing, but not recommended for production — it exposes a port on every node and bypasses proper load balancing.
LoadBalancer
Provisions an external load balancer from your cloud provider (AWS, GCP, Azure, etc.), giving you a public IP or hostname. This is the standard way to expose public-facing apps in production.
ExternalName
Maps a Service to an external DNS name. Useful for integrating with external services (like a managed database) without hardcoding URLs in your app.
Service YAML
# service.yamlapiVersion: v1kind: Servicemetadata: name: my-app-servicespec: selector: app: my-app # Routes traffic to Pods with this label ports: - protocol: TCP port: 80 # Port the Service listens on targetPort: 80 # Port on the Pod to forward to type: ClusterIP
Exercise 8: Services and Internal DNS
kubectl apply -f service.yaml# Every Service gets an automatic DNS name inside the cluster:# Format: <service-name>.<namespace>.svc.cluster.local# e.g.: my-app-service.default.svc.cluster.local# Within the same namespace, just: my-app-service# Test DNS resolution from inside the clusterkubectl run tmp-shell --rm -it --image=curlimages/curl -- sh# Inside the shell:curl my-app-servicecurl my-app-service.default.svc.cluster.local # fully-qualified form
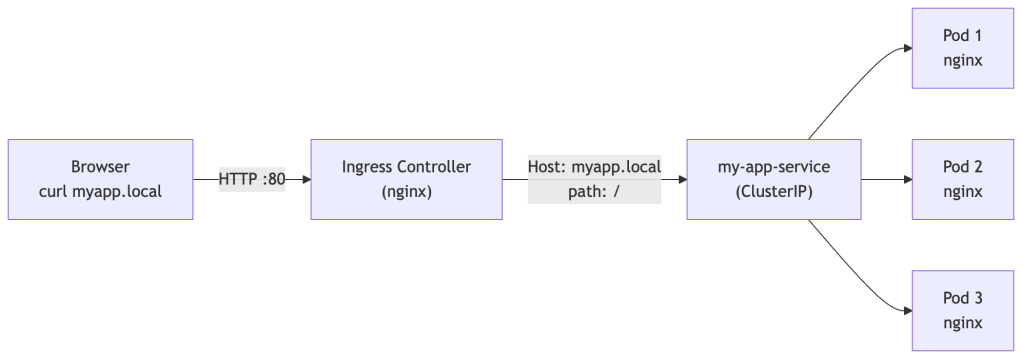
Ingress: The Smart HTTP Router
For production web traffic, you typically put an Ingress in front of your Services. An Ingress routes HTTP/HTTPS traffic based on rules (hostnames, URL paths).
Critical: An Ingress resource by itself does nothing. It requires an Ingress Controller to be installed in the cluster — a running component that reads Ingress objects and actually configures the routing. Popular controllers include nginx, Traefik, and HAProxy. Without a controller, your Ingress YAML is just ignored.
Exercise 9b: End-to-End Ingress Walkthrough
This exercise builds on the my-app Deployment and my-app-service Service from earlier. By the end you’ll hit a real hostname routed through the Ingress controller to your Pods.
Mac users — read this before starting: On Mac, minikube runs inside a VM or Docker container. The minikube IP (e.g.
192.168.49.2) lives inside that VM’s private network and is not directly reachable from your Mac. The steps below have a Mac-specific section to handle this. Linux and Windows users can follow the standard path.
Step 1 — Enable the Ingress controller (minikube)
minikube addons enable ingress# Wait until the controller Pod is Running (takes ~60 seconds)kubectl get pods -n ingress-nginx --watch# Look for: ingress-nginx-controller-xxx Running
Step 2 — Create the Ingress resource
Save the following as ingress.yaml:
# ingress.yamlapiVersion: networking.k8s.io/v1kind: Ingressmetadata: name: my-app-ingress annotations: nginx.ingress.kubernetes.io/rewrite-target: /spec: rules: - host: myapp.local http: paths: - path: / pathType: Prefix backend: service: name: my-app-service port: number: 80
kubectl apply -f ingress.yaml# Verify the Ingress was created and has an address assignedkubectl get ingress my-app-ingress
Expected output (ADDRESS populates after ~30 seconds):
NAME CLASS HOSTS ADDRESS PORTS AGEmy-app-ingress nginx myapp.local 192.168.49.2 80 45s
If ADDRESS is blank after a minute, the Ingress controller isn’t running yet — recheck Step 1.
Step 3 — Make the hostname reachable (OS-specific)
This is where Mac and Linux/Windows diverge.
🍎 Mac
On Mac, the minikube IP is not routable from your host. You need minikube tunnel to bridge your Mac’s localhost into the cluster.
Open a new terminal window and run:
minikube tunnel
It will prompt for your sudo password (it needs to bind to ports 80 and 443). Leave this terminal open for the entire exercise — closing it stops the tunnel.
✅ Tunnel successfully started🏃 Starting tunnel for service my-app-ingress.
Now add this line to /etc/hosts (use 127.0.0.1, not the minikube IP):
sudo sh -c 'echo "127.0.0.1 myapp.local" >> /etc/hosts'
🐧 Linux
The minikube IP is directly reachable on Linux. Get it and add it to /etc/hosts:
echo "$(minikube ip) myapp.local" | sudo tee -a /etc/hosts
🪟 Windows
minikube ip # note the IP, e.g. 192.168.49.2
Open C:\Windows\System32\drivers\etc\hosts as Administrator in Notepad and add:
192.168.49.2 myapp.local
Step 4 — Verify routing works
# Should return nginx HTMLcurl http://myapp.local# Or open in your browseropen http://myapp.local # Macxdg-open http://myapp.local # Linux# Windows: just paste http://myapp.local into a browser
You should see the nginx welcome page served through the Ingress controller.
If you’re on Mac and it still times out, confirm the tunnel is still running in its terminal window and that /etc/hosts has 127.0.0.1 (not the minikube IP).
Step 5 — Inspect what Kubernetes created
# Full details of the Ingress, including routing rules and backendkubectl describe ingress my-app-ingress
Look for the Rules section — it shows exactly which host + path maps to which Service and port.
Step 6 — Confirm the controller is doing the routing (optional deep-dive)
# The Ingress controller is just a Pod — you can see its access logskubectl logs -n ingress-nginx \ $(kubectl get pods -n ingress-nginx -o name | grep controller) \ --tail=20
You’ll see a new access log line appear each time you curl myapp.local.
Step 7 — Clean up
kubectl delete ingress my-app-ingress# Remove the /etc/hosts entry# Mac/Linux — remove the line you added:sudo sed -i '' '/myapp.local/d' /etc/hosts # Macsudo sed -i '/myapp.local/d' /etc/hosts # Linux# Mac only — stop the tunnel in its terminal window with Ctrl+C
What you just validated end-to-end:
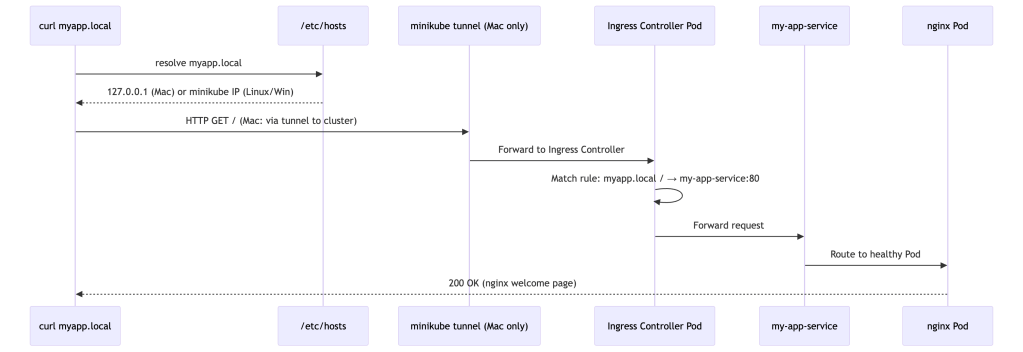
Why the difference? On Linux, the minikube network is routed directly to your host. On Mac, minikube runs inside a VM whose network is isolated —
minikube tunnelcreates a temporary route via localhost to bridge that gap.
Part 7 — Configuration and Secrets
Why Not Hardcode Config?
If you bake configuration into your container image, you need a new image for every environment (dev/staging/prod). Kubernetes provides two resources to inject config externally, keeping your images portable.
ConfigMaps
# configmap.yamlapiVersion: v1kind: ConfigMapmetadata: name: app-configdata: LOG_LEVEL: "debug" APP_ENV: "staging" config.json: | { "timeout": 30, "retries": 3 }
Using a ConfigMap in a Deployment:
spec: containers: - name: my-app image: nginx env: - name: LOG_LEVEL valueFrom: configMapKeyRef: name: app-config key: LOG_LEVEL volumeMounts: - name: config-volume mountPath: /etc/config volumes: - name: config-volume configMap: name: app-config
ConfigMap update behavior:
- When a ConfigMap is mounted as a volume, the files on disk are updated automatically — but with a delay (typically up to a minute). Importantly, the application must re-read the file to pick up changes. Apps that cache config at startup won’t see updates without a restart.
- When a ConfigMap is used as an environment variable, the Pod must be restarted to see updated values — env vars are set at container start and do not live-update.
Secrets
Secrets work similarly to ConfigMaps but are intended for sensitive data.
Important security details:
- Secrets are stored base64-encoded in etcd. Base64 is encoding, not encryption — anyone with etcd access can decode them trivially.
- By default, Secrets are not encrypted at rest in etcd. You can enable encryption at rest in the API server configuration, but it requires explicit setup.
- All communication between your app and the API server is over TLS.
- Access to Secrets is controlled by RBAC — only authorized service accounts and users can read them.
# secret.yamlapiVersion: v1kind: Secretmetadata: name: app-secretstype: Opaquedata: DB_PASSWORD: cGFzc3dvcmQxMjM= # base64 of "password123" API_KEY: c3VwZXJzZWNyZXQ= # base64 of "supersecret"
# Create a secret without manually base64-encodingkubectl create secret generic app-secrets \ --from-literal=DB_PASSWORD=password123 \ --from-literal=API_KEY=supersecret# Values are hidden in describe outputkubectl get secretskubectl describe secret app-secrets
Exercise 9: ConfigMap in Practice
kubectl apply -f configmap.yamlkubectl get configmap app-configkubectl describe configmap app-config# Edit the ConfigMap livekubectl edit configmap app-config# (Volume-mounted Pods will pick up the change after a short delay;# env-var Pods will NOT until they restart)
Production secret management: For real workloads, look into HashiCorp Vault, Sealed Secrets, or External Secrets Operator — these provide proper secret lifecycle management, rotation, and audit trails.
Part 8 — Storage: Keeping Data Alive
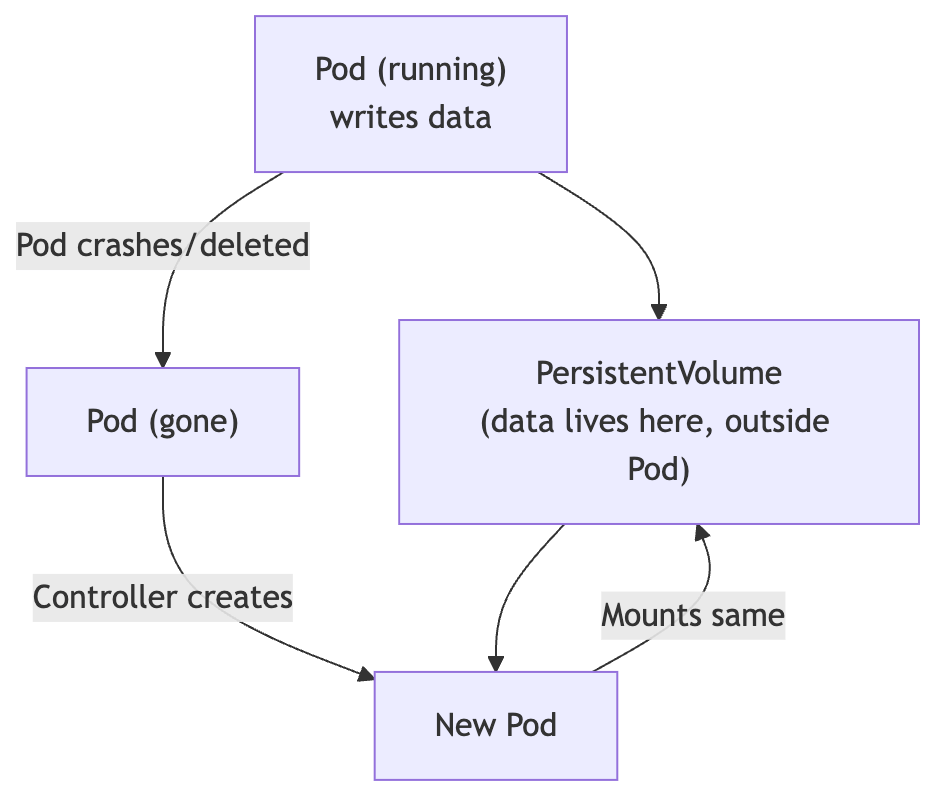
The Ephemeral Problem
When a Pod dies, everything written to its container filesystem is gone. For stateless apps (web servers, APIs), that’s fine. For databases, that’s catastrophic.
Storage Concepts
Volume
Tied to a Pod’s lifecycle. Shared between containers in a Pod. Types include emptyDir (temporary scratch space), hostPath (mounts a directory from the node), and many others. Disappears with the Pod for ephemeral types.
PersistentVolume (PV)
A piece of storage provisioned in the cluster — either manually by an admin or automatically (dynamically). Lives independently of any Pod.
PersistentVolumeClaim (PVC)
A user’s request for storage. Specifies size, access mode, and optionally a StorageClass. Kubernetes binds a PVC to a matching PV.
StorageClass
Defines the type and provisioner of storage (e.g., SSD vs HDD, local vs cloud block storage). Enables dynamic provisioning — when you create a PVC, the StorageClass automatically creates a PV to satisfy it.

PVC Example
# pvc.yamlapiVersion: v1kind: PersistentVolumeClaimmetadata: name: my-dataspec: accessModes: - ReadWriteOnce # One node can read/write at a time resources: requests: storage: 1Gi # No storageClassName specified = uses the cluster default # Check available classes with: kubectl get storageclass
# Use PVC in a Podspec: containers: - name: my-db image: postgres:15 volumeMounts: - mountPath: "/var/lib/postgresql/data" name: db-storage volumes: - name: db-storage persistentVolumeClaim: claimName: my-data
Exercise 10: PVC with minikube
# Check what StorageClasses are available in your clusterkubectl get storageclass# Create the PVCkubectl apply -f pvc.yaml# Verify it bound to a PVkubectl get pvc# STATUS should be: Bound
StatefulSets: For Databases and Stateful Apps
For databases and other stateful applications, use a StatefulSet instead of a Deployment. StatefulSets provide guarantees that Deployments don’t:
- Stable, unique Pod names (pod-0, pod-1, pod-2 — never random suffixes)
- Stable network identities (each Pod gets its own DNS hostname)
- Ordered, graceful startup and shutdown (pod-0 before pod-1, etc.)
This is critical for clustered databases like PostgreSQL, Cassandra, or Kafka, where each node has a distinct role and identity.
Part 9 — Observability: Knowing What’s Going On
The Three Pillars of Observability
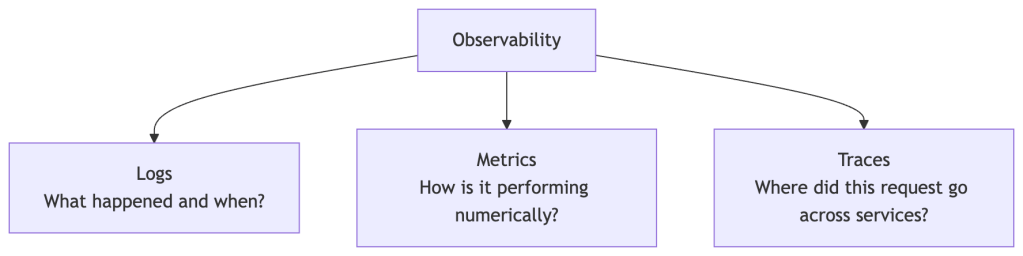
Kubernetes provides primitives for all three, but a full observability stack requires additional tooling.
Logs
# Basic logskubectl logs <pod-name># Follow logs in real timekubectl logs -f <pod-name># Logs from a specific container in a multi-container Podkubectl logs <pod-name> -c <container-name># Logs from the previous (crashed) container instancekubectl logs <pod-name> --previous# Logs from all pods matching a label (requires kubectl 1.14+)kubectl logs -l app=my-app --all-containers=true
Events
Events are Kubernetes’s audit trail — they record what happened to resources and are invaluable for debugging:
# All recent events, sorted by timekubectl get events --sort-by=.metadata.creationTimestamp# Events for a specific resource (look at the Events section at the bottom)kubectl describe pod <pod-name>kubectl describe deployment my-app
Health Checks (Probes)
Kubernetes has three built-in health check mechanisms. Configuring these correctly is one of the most impactful things you can do for reliability:
Liveness Probe — Is the container alive? If it fails, kubelet restarts the container.
Readiness Probe — Is the container ready to receive traffic? If it fails, the Pod is removed from Service endpoints (traffic stops going to it) but it is not restarted.
Startup Probe — For slow-starting apps. Disables liveness and readiness checks until the startup probe succeeds, giving the app time to initialize.
spec: containers: - name: my-app image: nginx startupProbe: httpGet: path: /healthz port: 80 failureThreshold: 30 # Give up to 30 * 10s = 5 minutes to start periodSeconds: 10 livenessProbe: httpGet: path: /healthz port: 80 initialDelaySeconds: 10 periodSeconds: 5 readinessProbe: httpGet: path: /ready port: 80 initialDelaySeconds: 5 periodSeconds: 3
Resource Metrics
# Enable metrics-server (minikube only)minikube addons enable metrics-server# View CPU and memory usagekubectl top nodeskubectl top podskubectl top pods --sort-by=memory # Sort by memory usage
Popular Observability Tools
| Tool | Purpose | Link |
|---|---|---|
| Prometheus | Metrics collection and alerting rules | prometheus.io |
| Grafana | Dashboards and visualization | grafana.com |
| Loki | Log aggregation (Grafana’s log tool) | grafana.com/oss/loki |
| Jaeger | Distributed tracing | jaegertracing.io |
| k9s | Terminal UI for Kubernetes | k9scli.io |
| Lens | Desktop GUI for Kubernetes | k8slens.dev |
💡 Start with k9s immediately. It’s a terminal dashboard that makes navigating pods, logs, and events dramatically faster than typing raw kubectl commands. Install it and never look back.
Part 10 — Putting It All Together: The Big Picture
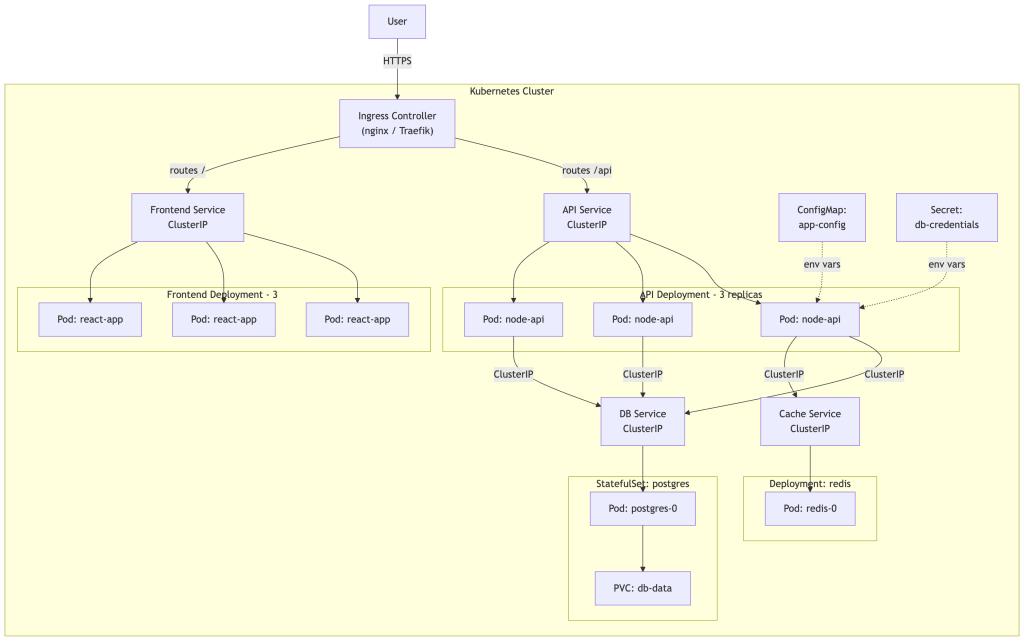
A Real-World Application Architecture
Let’s see how all the pieces interact in a typical production-style web application:
The Kubernetes Development Workflow

Key Concepts Recap
What We Haven’t Covered (But You Should Know Exists)
Helm — The package manager for Kubernetes. Instead of managing raw YAML, Helm lets you install pre-packaged applications called charts with version management and templating. helm.sh
RBAC (Role-Based Access Control) — Controls who (users, service accounts) can do what (get, create, delete) on which resources. Essential for multi-team clusters.
NetworkPolicy — Firewall rules for Pod-to-Pod communication. By default all Pods can talk to each other; NetworkPolicies let you restrict this.
DaemonSet — Ensures a Pod runs on every node in the cluster. Used for node-level tools like log collectors, monitoring agents, and network plugins.
Job / CronJob — Run one-off or scheduled tasks. A Job runs to completion; a CronJob runs on a schedule (like cron).
Horizontal Pod Autoscaler (HPA) — Automatically scales a Deployment’s replica count based on CPU/memory metrics or custom metrics.
Operators — Custom controllers that encode operational knowledge about complex applications (e.g., how to set up a Postgres cluster, handle failover, run backups). operatorhub.io
Service Mesh (Istio, Linkerd) — Infrastructure layer for advanced traffic management, mutual TLS between services, and deep observability without touching app code.
Pod Disruption Budgets (PDB) — Guarantee a minimum number of Pods stay up during voluntary disruptions (like node maintenance).
Managed Kubernetes: Running in Production
In production, most teams use a managed Kubernetes service where the cloud provider operates the control plane for you:
| Provider | Service |
|---|---|
| AWS | EKS (Elastic Kubernetes Service) |
| Google Cloud | GKE (Google Kubernetes Engine) |
| Azure | AKS (Azure Kubernetes Service) |
| DigitalOcean | DOKS |
| Hetzner (budget option) | Hetzner K8s |
Where to Go Next
| Resource | Link |
|---|---|
| Official Kubernetes Docs | kubernetes.io/docs |
| Interactive Tutorial (browser, no setup needed) | kubernetes.io/docs/tutorials |
| KodeKloud (video + interactive labs) | kodekloud.com |
| CNCF Landscape (ecosystem map) | landscape.cncf.io |
| Kubernetes the Hard Way | github.com/kelseyhightower |
| Play with Kubernetes (browser-based cluster) | labs.play-with-k8s.com |
| CKA Exam (Certified Kubernetes Administrator) | cncf.io/training/certification/#cka |
Final Exercise: Deploy a Multi-Tier App
Try deploying a simple app with a frontend and a backend. Here’s your challenge:
- Create a Namespace called
my-project - Deploy nginx as your “frontend” with 2 replicas in that namespace
- Deploy
kennethreitz/httpbinas your “backend” with 2 replicas - Create ClusterIP Services for both
- Enable the nginx Ingress controller and create an Ingress that routes
/to frontend and/apito backend - Add a ConfigMap with a custom environment variable and reference it in the backend Deployment
- Set resource requests and limits on both Deployments
- Add a readiness probe to both Deployments
- Scale the frontend to 4 replicas
- Trigger a rolling update on the frontend (change image to
nginx:alpine) - Roll it back
This covers: Namespaces, Deployments, Services, Ingress, ConfigMaps, Resource Management, Health Probes, Scaling, Rolling Updates, and Rollbacks — everything from this series!
Appendix — Common Beginner Mistakes
These mistakes are extremely common. Knowing them in advance will save you hours of debugging.
1. Hardcoding Pod IPs
Mistake: Connecting to a Pod by its IP address directly.
Why it breaks: Pod IPs change every time a Pod is rescheduled or restarted.
Fix: Always use a Service name. Use DNS: http://my-service or http://my-service.my-namespace.
2. Using NodePort in Production
Mistake: Exposing apps via NodePort for production traffic.
Why it’s wrong: It opens a port on every node, bypasses cloud load balancer health checks, and doesn’t scale well.
Fix: Use LoadBalancer Services or an Ingress with a LoadBalancer-type controller.
3. Not Setting Resource Requests
Mistake: Deploying Pods with no resources.requests defined.
Why it breaks: The scheduler has no data to place Pods correctly. Nodes can become overloaded, causing unpredictable OOMKills and CPU starvation across the cluster.
Fix: Always set both requests and limits. Start conservative and tune based on observed usage.
4. Running Databases in Deployments
Mistake: Using a Deployment for stateful apps like PostgreSQL or MySQL.
Why it breaks: Deployments don’t guarantee stable Pod names, stable network identity, or ordered startup/shutdown — all of which clustered databases depend on.
Fix: Use StatefulSets for any stateful workload that requires identity or ordered operations.
5. Not Setting Readiness Probes
Mistake: Deploying apps with no readiness probe.
Why it breaks: Kubernetes sends traffic to a Pod the moment the container starts — even before your app has finished initializing. Users hit errors during startup and rolling updates.
Fix: Add a readiness probe that checks your app’s actual health endpoint before traffic is sent to it.
6. Storing Secrets in Git or ConfigMaps
Mistake: Committing Secret YAML with real values to source control, or storing passwords in ConfigMaps.
Why it breaks: Secrets in git are compromised forever. ConfigMaps have no access controls.
Fix: Use kubectl create secret from CI/CD pipelines, or a secrets management tool like Vault or Sealed Secrets.
7. Using latest Image Tags
Mistake: Deploying with image: myapp:latest.
Why it breaks: latest is mutable — the same tag can point to different images over time, making rollbacks unreliable and deployments non-deterministic.
Fix: Always use immutable, specific version tags like myapp:v1.4.2 or myapp:sha-abc1234.
8. Ignoring the Events Section
Mistake: Only looking at Pod status (Running, CrashLoopBackOff) and not reading events.
Why it slows you down: Events are where Kubernetes tells you why something failed — image pull errors, OOMKills, failed scheduling, volume mount failures.
Fix: Always run kubectl describe pod <name> and read the Events section at the bottom first when debugging.
Happy orchestrating! 🚢

Leave a comment